Zach’s Favorite Chocolate Chip Skillet Cookie

INGREDIENTS

  • 1 3/4 cups (248g) all-purpose flour, scoop and level to measure
  • 1/2 tsp baking soda
  • 1/2 tsp salt
  • 12 Tbsp (170g) unsalted butter, melted, divided
  • 3/4 cup (150g) packed light brown sugar
  • 1/3 cup (70g) granulated sugar
  • 1 large egg
  • 1 large egg yolk
  • 1 tsp vanilla extract
  • 1 cup (170g) semi-sweet chocolate chips (or mix-ins of your choice – see notes)
  • Maldon sea salt flakes to sprinkle on top, if desired

INSTRUCTIONS

  • Preheat oven to 350 degrees.
  • Place butter into cast iron skillet and put into oven as it preheats. Once melted, leave about 1 tbsp of butter in pan and put the remaining melted butter into a large mixing bowl. Allow the melted butter to cool down a little bit before slightly adding additional ingredients.
  • Once cooled, add the following to the bowl with the melted butter: brown sugar, granulated sugar, and salt.
  • Add egg, egg yolk and vanilla and stir until combined.
  • Sift in flour and baking soda, then stir until combined.
  • Mix in chocolate chips.
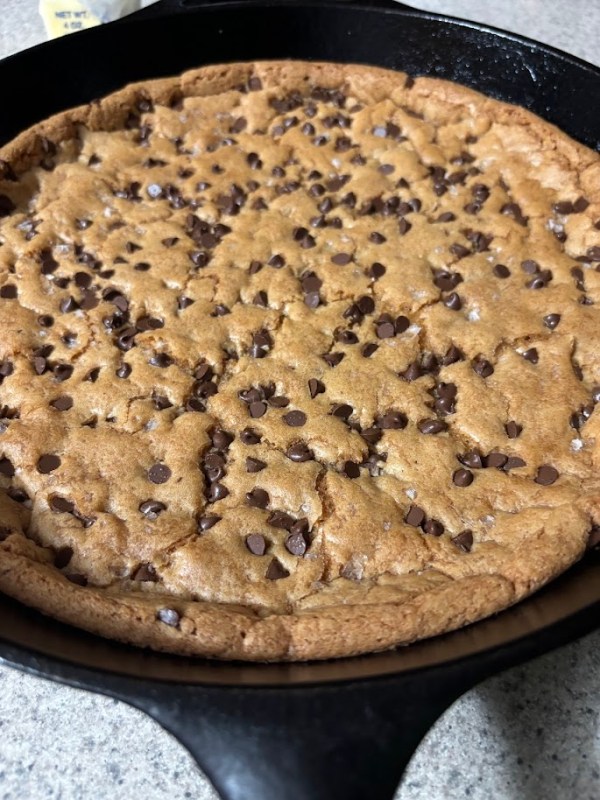
  • Scoop dough out into prepared skillet and spread into an even layer.
  • Sprinkle with Maldon flaked sea salt, if desired.
  • Bake in preheated oven until cook appears slightly under-baked in center, it will continue to cook from the residual heat of the pan for a few minutes once removed from the oven, about 18 to 20 minutes.
  • Spoon out and serve warm with vanilla ice cream if desired or let cool at least 30 minutes to cut into slices.

NOTES

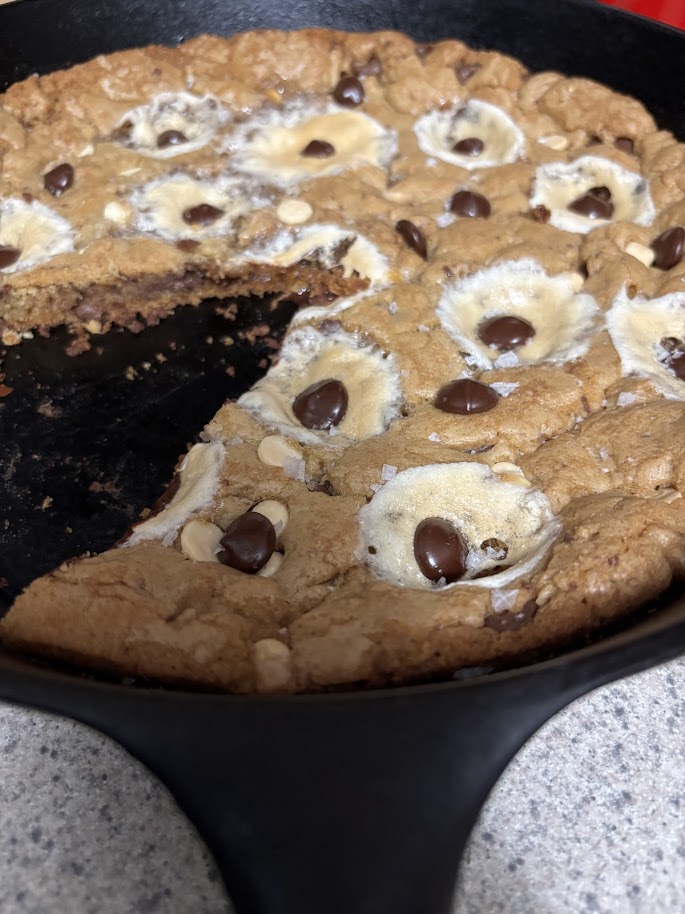
The above recipe is a template. Feel free to add in any number of mix-ins. One of our favorites is the addition of marshmallows (that have been halved and pressed into dough), white chocolate chips, and graham cracker pieces. I like to press in additional chocolate chips on top for decoration purposes. Not to mention topping with flaked sea salt!

Enjoy!


Countdown to Christmas: 25 Days of Baking Traditions

When my children were growing up, Christmas was always the time of year that my love language of baking went into overdrive! I miss the days of multiple Christmas trees and outdoor decorations, but one of the things I refuse to give up as my children get older is showering them with baked goods during the holidays. For me, straight from my kitchen is straight from my heart!

And this year? Well, it was time to document family favorites so that my children can start their own traditions with their own families when the time comes.

It’s tiiiIIIiiiime!


Hopefully you can bring a little bit of childhood nostalgia into your own home this holiday season and for many years to come.

Merry Christmas, kiddos! I love you so much.

Sopapillas

INGREDIENTS

  • 2 cups all-purpose flour
  • 2 teaspoons baking powder
  • 1 teaspoon salt
  • 2 tablespoons shortening
  • 3/4 cup warm water
  • 1 to 2 cups canola oil for frying

INSTRUCTIONS

  • In a large bowl, sift together flour, baking powder, and salt. Cut in shortening until mixture resembles coarse crumbs. Gradually stir in water just until dough pulls together.
  • Divide dough into 5 pieces. Roll out each piece of dough on lightly floured board into an 8-inch diameter circle. Cut each circle into 4 wedges.
  • Heat oil in a deep frying pan. Add a few of the tortilla wedges at a time. The wedges will puff up. Turn once so they will puff evenly on both sides; then turn back to brown on both sides.
  • Drain on paper towels. While warm, coat each sopaipilla with powdered sugar or cinnamon-sugar, if desired. Serve with honey.

NOTES

On a road trip to the Grand Canyon, we once stopped at a restaurant in Albuquerque called El Patio de Albuquerque in order to try something local. One Google review said that it was a must to try to adovada as a stuffed sopapilla, and I’m so glad that I did.

When someone asks me what my favorite meal is, I often immediately think of that moment in time. A lot of what makes that meal special is the sentimental circumstances of that moment (sitting on that patio, eating an amazing meal with my brother, my oldest son who was moving soon to another state, and Juno, my new puppy, while enjoying a moment of rest and relaxation during a road trip West to see the Grand Canyon and Sedona via a new camper), but the meal itself was outstanding, especially the warm sopapilla and honey that was served to the table to compliment the meal. One of many, I will be chasing the warmth of that memory for as long as I breathe.


Since then, I found a few recipes for homemade sopapillas, and they hit the spot now and then even though they are never quite as soft and pillowy as those at El Patio de Albuquerque! I hope you enjoy them as well.

The above recipe is from Muy Bueno: Basic Sopaipilla Recipe (New Mexican Sopapillas) – Muy Bueno. Check out their video to get a sneak peek of these beauties:

Grandma Marilyn’s Caramel Corn

INGREDIENTS

  • 8 quarts of popped popcorn (2/3 cups of unpopped popcorn, prepared OR 3 bags of popped microwave popcorn)
  • 1 cup butter
  • 2 cups brown sugar
  • 1/2 cup light Karo corn syrup
  • 1 tsp salt
  • 1 tsp baking soda
  • 1 tsp vanilla (my addition)

INSTRUCTIONS

  • Place popped popcorn in large roasting pan (or aluminum pan)
  • Combine the butter, sugar, Kara, and salt into a medium saucepan. It needs to be enough for the caramel to expand once additional ingredients are added. On medium-high heat, bring ingredients to a boil, and once bubbly, boil for 5 minutes, stirring constantly.
  • Remove from heat and stir in the baking soda. This will expand and become foamy.
  • Add in vanilla, if desired.
  • Pour ingredients over the popcorn and stir to evenly coat. It is okay if it does not cover all the popcorn at this time.
  • Put in a 200 degree oven for one hour, stirring every 15 minutes. The caramel will loosen and cover more popcorn with each stir.
  • While waiting, line counter with parchment paper.
  • Once your hour in the oven is complete, pour cooked caramel corn onto parchment paper and allow to cool.

NOTES

This is your grandmother’s version (see below from the compilation cookbook that was put together after your grandmother’s passing), and it is very similar to the Amish Caramel Corn recipe I always made when you were growing up. I have added a note to add vanilla to make this closer to that recipe. Enjoy!

Ina Garten’s Brownie Pudding

INGREDIENTS

  • 1/2 pound (2 sticks) unsalted butter, plus extra for buttering the dish
  • 4 extra-large eggs, at room temperature
  • 2 cups sugar
  • 3/4 cup good cocoa powder
  • 1/2 cup all-purpose flour
  • Seeds scraped from 1 vanilla bean
  • 1 tablespoon framboise liqueur, optional
  • Vanilla ice cream, for serving

INSTRUCTIONS

  • Preheat the oven to 325 degrees F. Lightly butter a 2-quart (9 by 12 by 2-inch) oval baking dish. Melt the 1/2 pound of butter and set aside to cool.
  • In the bowl of an electric mixer fitted with the paddle attachment, beat the eggs and sugar on medium-high speed for 5 to 10 minutes, until very thick and light yellow. Meanwhile, sift the cocoa powder and flour together and set aside.
  • When the egg and sugar mixture is ready, reduce the speed to low and add the vanilla seeds, framboise, if using, and the cocoa powder and flour mixture. Mix only until combined. With mixer still on low, slowly pour in the cooled butter and mix again just until combined.
  • Pour the brownie mixture into the prepared dish and place it in a larger baking pan. Add enough of the hottest tap water to the pan to come halfway up the side of the dish and bake for exactly 1 hour. A cake tester inserted 2 inches from the side will come out 3/4 clean. The center will appear very under-baked; this dessert is between a brownie and a pudding.
  • Allow to cool and serve with vanilla ice cream.

NOTES

This is AMAZING! It walks a thin line between molten lava cake and brownie. Make sure you commit to the bit and cream the specified mixture a full 10 minutes as instructed as it does something magical to this decadent dessert. I cannot recommend this highly enough.


Audrey’s Favorite Cake Pops

INGREDIENTS

  • 1 freshly baked cake from this recipe (Preppy Kitchen’s Hot Milk Cake) or any box cake mix, if desired
  • 1 package almond bark
  • toppings (sprinkles, etc.)

INSTRUCTIONS

  • Bake this recipe (Preppy Kitchen’s Hot Milk Cake) as instructed. Do not add powdered sugar topping.
  • While still hot, put the insides of the cake into the stand mixer, leaving the very edges that are crispy and brown in pan to snack on later. The tasty edges are the best part anyway!
  • Mix the cake at a low speed until the desired texture is reached.
  • Using a small cookie scoop, form dough into balls and place on a lined baking sheet.
  • Once all dough balls are formed, allow to cool completely.
  • Place cooled cake balls into the fridge while melting your almond bark and gathering toppings.
  • If you have a plastic fork available, remove all but the center tine. This will be used to spear each cake ball for dipping.
  • In a ceramic mug, melt a few almond bark squares at a time in the microwave. Start off with 30 seconds before stirring, and follow up every 10 seconds of microwave time between stirs until the almond bark is melted.
  • Using the single tine on your plastic fork, spear your cold cake ball and dip into melted almond bark to completely cover. Allow excess to drip back into the cup and then place covered cake ball onto prepared baking sheet.
  • Dip the tine back into the almond bark and place a small amount to cover the hole left behind by the fork’s tine. Swirl remaining almond bark on tine to decorate as desired.
  • Immediately use your sprinkles or other toppings to decorate your cake ball as the almond bark will harden quickly.
  • Continue to repeat process until all cake balls are covered.
  • Place covered cake balls into fridge to completely set.
  • Enjoy!

NOTES

I do not use a popsicle stick as with traditional cake pops. We just pop them in our mouths! Just a reminder to make sure that you allow excess almond bark to drip off of cake pops while coating to ensure that the coating is thin or it will be a struggle to eat them. Feel free to use a box cake, if desired. Do note that you may have to use a few spoons full of a complimentary cake icing into batter when using some boxed mixes as they tend to be drier than the homemade cake recommended above. Either way, they will be delicious, I’m sure!


Hot Milk Cake

Original recipe: Hot Milk Cake – Preppy Kitchen

INGREDIENTS

  • 1 cup whole milk (240mL)
  • ½ cup unsalted butter (113g)
  • 2 cups all-purpose flour (240g)
  • 2 teaspoons baking powder
  • ½ teaspoon salt
  • 2 cups granulated sugar (400g)
  • 4 large eggs
  • 1½ teaspoons vanilla extract
  • Powdered sugar for dusting

INSTRUCTIONS

  • Preheat the oven to 350°F. Grease a 9×13-inch baking pan with baking spray.
  • Heat the milk and butter in a small saucepan, stirring occasionally, just until bubbling and butter is melted, about 5 minutes.
  • Meanwhile, in a medium bowl, whisk together the flour, baking powder, and salt. Set aside.
  • In a large mixing bowl or the bowl of a stand mixer fitted with a paddle attachment, beat the granulated sugar and eggs on medium-high until fluffy, 3 to 4 minutes. Add the flour mixture and beat on low until just incorporated. With the mixer running on low, gradually pour in the hot milk mixture. Stir in vanilla extract. Pour batter into the prepared baking pan.
  • Bake for 28 to 32 minutes or until lightly browned, and a toothpick inserted in the center comes out clean. Let the cake cool completely in the pan on a wire rack. Dust the cake with powdered sugar before slicing and serving.

NOTES

Please go to the linked original recipe or watch the embedded video below for detailed instructions regarding this amazing cake. I am copy/pasting for posterity’s sake, but the step-by-step instructions are recipe specific details provided in the original recipe are so important to understanding the magic of this recipe.

According to Zach, this is his favorite cake. It is also the cake that I use to make my cake pops. It is a great way to use up milk that is going to expire soon. There’s something so perfect about the crumb and the outer edges of this cake … and so simple with its coating of powdered sugar instead of icing. I will never tire of it!


Ritz Peanut Butter Crack Sammies

INGREDIENTS

  • Ritz crackers
  • Almond bark (at least 3 squares)
  • Peanut butter (or spread of your choice such as almond butter, cookie butter, Nutella, melted Rollo, etc.)
  • Toppings of your choice (see notes)

INSTRUCTIONS

  • Decide how many treats you wish to make and make sure you have 2 Ritz crackers for each.
  • Spread peanut butter on half the crackers.
  • Prepare any toppings you may have for easy access is the next steps will have to take place quickly to ensure that the toppings are able to be placed on almond bark coating before it hardens.
  • Melt almond bark and spoon a small circle of warm, liquid almond bark on a parchment paper lined baking sheet.
  • Immediately place the cracker with peanut butter directly on top of the almond bark so that it will form a coating on the cracker for a bottom.
  • Quickly do this for every bottom half of your treats.
  • Once all the peanut butter topped halves have been placed atop their corresponding almond bark circle, place the remaining cracker half on top of the peanut butter to form your cracker sandwich.
  • Using a fork or other utensil, drizzle remaining almond bark on the top of your cracker sandwiches.
  • Immediately top with any toppings you may prefer. For me, that is some honey roasted almonds that I pulse in a blender or food processor, a few sprinkles, and a chocolate chunk or chopped candy bar that I may have on hand.
  • Place in refrigerator to set and then enjoy!

NOTES

This is not so much a recipe than a treat that is made whenever I’m trying to use up leftover almond bark, usually after making Audrey’s Oreo Truffles. The ingredients are never the same … just a mixture of delicious things I have on hand at the time. However, the ingredients pictured (crushed honey roasted almonds, a few sprinkles, and a chopped mini Hershey bar) is one of my favorite combinations! They are addictive and honestly worthy of making on their own, especially for Halloween. See below for how to decorate them for a spooky mummy treat!


Audrey’s Favorite Oreo Truffles

INGREDIENTS

  • 1 package of mint Oreos
  • 4 ounces of cream cheese (1/2 block)
  • 1 package of white almond bark
  • Sprinkles or additional crushed oreos
  • Plastic fork

INSTRUCTIONS

  • Add 1 package of mint Oreos to a stand mixer.
  • Starting off slowly, crush Oreos until it forms a paste. Some pieces will still be larger and crunchy.
  • Add in 4 ounces of cream cheese and mix until combined. If needed, add additional cream cheese from remaining block until it reaches desired consistency. I like to use as little as possible to ensure that the tartness of the cream cheese does not overpower the mint Oreo flavor.
  • Using a small cookie scoop, form balls and place onto lined cookie sheet.
  • Please dough balls into freezer for about 15 minutes while you prepare almond bark.
  • In a ceramic mug, place a few cubes of the almond bark to melt in microwave.
  • Microwave for 30 seconds and then stir, if needed. Continue to microwave in 10 second increments until bark is fully melted.
  • Take your plastic fork and remove all the tines except the middle one.
  • Once dough is chilled and bark is melted, begin coating your Oreo balls by spearing each ball with the single tine of your plastic fork. Lower the cold dough ball into the melted bark.
  • Once coated, place the truffle onto your prepared lined baking sheet. Use a small bit of bark on to cover the hole left behind by the fork tine and swirl to decorate, if desired. The coating should immediately begin to harden so any sprinkles or toppings should be added at this time.
  • Repeat process until all truffles are coated.

NOTES

Get creative! Feel free to use any flavor of Oreos and know that your decorative topping choices are unlimited! I have always wanted to use the Golden Oreos and top with pink almond bark & crushed freeze-dried strawberries for a Spring version, for example. Enjoy!

Easy Homemade Pretzels

Makes 4 large pretzels.

INGREDIENTS

  • 3/4 cup warm water (110 degrees F)
  • 1 tsp active dry yeast
  • 1 tsp sugar
  • 2 cups all-purpose flour
  • 1/2 tsp salt
  • 1 tbs melted butter, salted

Please note: Will also need water and baking soda mixture to boil pretzels prior to baking and an egg wash + kosher salt for that perfect pretzel crust.

INSTRUCTIONS

  • Whisk together warm water, yeast, and sugar. Allow to bloom for 10 minutes. Mixture should be foamy.
  • In a stand mixture, add your flour, salt, melted butter, and wet mixture. Kneed for 10 minutes.
  • Kneed a few minutes by hand before adding dough ball to greased bowl.
  • Cover dough with towel and allow to rest for one hour.
  • Once rested, turn dough out onto a lightly floured surface before dividing into four pieces.
  • Roll out into a noodle shape before shaping into pretzel. Grab the ends, cross x 2, and flip towards you.
  • Preheat oven to 450 degrees.
  • Boil water with baking soda.
  • Place each pretzel into boiling water — one at a time — for about 30 seconds.
  • Place boiled pretzels on a parchment lined baking tray.
  • Brush each pretzel with an egg wash and sprinkle generously with kosher salt.
  • Bake at 450 degrees for 15 minutes until brown and crispy.
  • Enjoy with your favorite cheese sauce or mustard.

NOTES

Original recipe was found on TikTok via user Revi (@reviskitchenn).

You can also just roll out as usual, and then instead of twisting into pretzel shape, divide roped dough into small pretzel bites before continuing the process. These would make amazing pretzel bites!

Create a website or blog at WordPress.com

Up ↑