Old-Fashioned Chocolate Chipper Cookie Recipe

Memories …

Lunchbox treats. Afternoon snacks. Offerings to Santa.

These cookies are a warm embrace.

My mother would make these for many occasions and every time I nibble one of these delicious, crispy chocolate chip cookies I am immediately transported to my childhood. When researching this recipe, it looks like it was originally published in the Joy of Cooking Cookbook, of which my mom was certainly a fan.

These have since found a place in my own home, and I hope that my children will have the same sensory memories that I share of my dearly departed mother whenever I smell these baking in the oven.

Noah, Zach, and Audrey? I love you so much.

375 degree oven / Greased Cookie Sheet

INGREDIENTS

  • 1/2 cup shortening
  • 1/2 cup sugar
  • 1/4 cup brown sugar
  • 1 egg
  • 1 teaspoon vanilla
  • 1 cup flour, sifted
  • 6 ounces package of semi-sweet chocolate chips
  • 1/2 cup chopped nuts, if desired

INSTRUCTIONS

Cream shortening, sugars, egg and vanilla. Slowly add flour and then fold in chocolate chips and nuts. Drop dough by the heaping tablespoon on to a parchment lined baking sheet. Cook at 375 for 10 – 12 minutes. Cookies will be done when the edges become slightly golden brown. Remove from cookie sheet immediately and let cool on a wire rack.

NOTES

These are old-fashioned cookies that will bake flat and crispy (akin to the Tate’s brand) instead of thick and cakey (Crumbl, for example).

We prefer our cookies slightly underbaked, golden crispy edges with a soft, chewy center. This is around the 8-10 minute mark with most ovens. Once removed from the oven, I finish the warm cookies with a sprinkle of Maldon flake salt for the satisfying, salty crunch!

Feel free to experiment … and don’t forget a tall glass of milk.

Have a favorite chocolate chip cookie recipe? Please share!

Hearty Chorizo & White Bean Stew Recipe

Serve with a crusty loaf of bread for a delicious, hearty meal.

INGREDIENTS

  • Olive oil
  • 1 yellow onion (or 4 shallots)
  • 1 carrot, cut into thin medallions
  • 1 stalk of celery, cut into thin slices
  • 1 serrano pepper (left whole with just the stem cut off, exposing the inner flesh/seeds)
  • 4 cloves of garlic, minced (to taste)
  • 2 tablespoons tomato paste
  • 1 tbsp of fresh rosemary/thyme (either/or/both)
  • 6 ounces of chorizo
  • 2 cans of white beans (Great Northern or cannellini)
  • 1 quart of chicken broth (or water with 2+ tablespoons of Boullion)
  • 1 bunch of greens (I used rainbow chard)
  • A few generous shakes of garlic powder and Badia complete
  • 1 teaspoon kosher salt (to taste)
  • 1/2 teaspoon of cracked black pepper (to taste)
  • 1 tablespoon of red pepper flakes (to taste)
  • 1/3 cup of grated parmesan cheese
  • 1-1/2 teaspoons of red wine vinegar
  • 1/2 cup of ditalini pasta, if desired

INSTRUCTIONS

  1. Coat Dutch oven with olive oil & add in veggies to caramelize and soften, saving the minced garlic until the end to ensure it does not burn. Just a reminder to leave the serrano pepper whole!
  2. Once veggies are softened, add in your chorizo and cook through before making a well in the center of your pan to add in your tomato paste. Caramelize your tomato paste for at least 2 minutes to ensure it has optimized flavor.
  3. Add in herbs and spices, before adding in broth, beans, and greens. Cook for about 20 minutes (or until greens are wilted).
  4. Using an immersion blender, make a few quick passes to blend just enough to thicken soup. Do not blend smooth! The satisfying textures of the vegetables, chorizo, and beans are the best part of this stew.
  5. If using, add in the pasta and cook for about 15 minutes on medium heat (or until pasta is desired tenderness).
  6. When pasta is desired tenderness, add in parmesan cheese and red wine vinegar.

NOTES

How much you use the immersion blender will have a large impact on how thick this stew is. For colder months, a thicker, hearty stew will hit the spot. For warmer months, leaving it thinner will give it more of a soup-like feel for a light, healthy meal. Top with additional grated parmesan, a few red pepper flakes, and serve with a crusty sourdough loaf for a meal to remember.

This one if for you, Audrey. I love you so much!

Ultimate Spicy Chili Recipe for Snow Days

This is a must-have for any snow day!

INGREDIENTS

  • Olive oil
  • 1 yellow onion (or 4 shallots)
  • 1/2 red bell pepper
  • 1/2 green bell pepper
  • 1 serrano pepper
  • 2 jalapeno pepper
  • 4 minced garlic cloves (or to taste)
  • 2 pounds lean ground beef
  • 1/4 cup Worcestershire sauce
  • garlic powder (to taste)
  • Badia complete (to taste)
  • 16 oz of beef broth (or water + 2 bouillon cubes)
  • 1 can (28 oz) of crushed tomatoes
  • 1 can (14.5 oz) of fire-roasted diced tomatoes
  • 1 can tomato paste (can leave out if you want more of a thin Wendy’s chili texture)
  • 2 tablespoons chili powder
  • 2 tablespoons cumin
  • 1 tablespoon brown sugar
  • 1 tablespoon hot sauce (I used Scotch Bonnet)
  • 1 tablespoon dried basil
  • 2 tablespoons smoked paprika
  • 1 tablespoon dried oregano
  • 1 teaspoon of dried peri peri pepper flakes (crushed red pepper flakes will work!)
  • salt & pepper (to taste)
  • 3 cans of beans (I use 1 each of the following: pinto, black beans, and dark red kidney beans)
  • assorted toppings (cheese, sour cream, cilantro, diced onions, corn chips, etc.)

All seasonings can be adjusted to your own liking!

INSTRUCTIONS

  1. Chop your veggies into a small dice.
  2. Coat the bottom of a Dutch oven with olive oil and sauté your veggies until soft, around 5 minutes. If needed, add a little water to keep from sticking to bottom of the pan.
  3. Add in your ground beef to your caramelized veggies and cook until browned.
  4. Once your meat is browned, add in the Worcestershire sauce and flavor with a few generous shakes of dried garlic powder and Badia complete. Add a pinch of salt and pepper at this time as well.
  5. If using tomato paste (depending on if you want a thin or thick chili), make a well in the center of your meat and veggie mixture before adding your tomato paste. Allow your tomato paste to cook for about 2 minutes, ensuring that it caramelizes and optimizes its flavor.
  6. Once tomato paste is caramelized, add in your spices and cook for another minute, allowing them to bloom.
  7. Once spices are bloomed, add in the remaining ingredients: broth, cans of tomatoes, and beans.
  8. Once heated through and thickened (at least 20 minutes), taste and adjust spices accordingly.
  9. Top with cheese, sour cream, chopped cilantro, diced onions, corn chips, etc.

NOTES

While it looks like a lot of ingredients, most of them are spices and pantry staples. Feel free to use whatever you have on hand when it comes to peppers and beans, but the listed peppers are what I used to get praise-worthy results! I love a mix of beans (pinto, black beans, and dark red kidney beans) to give the chili different textures, so feel free to experiment there if you wish!

Nothing says love on a cold day like a bowl of spicy chili and a slice of warm, slathered corn bread.

I love you, kiddos!

Joe’s Holiday Prime Rib

INGREDIENTS
  • 1 bone in prime rib beef roast, 3 ribs, about 6 pounds
  • 5 garlic cloves, smashed
  • 1/4 cup grated fresh or prepared horseradish
  • Leaves from 2 fresh rosemary sprigs
  • Leaves from 4 fresh thyme sprigs
  • 1/2 cup kosher salt
  • 1/4 cup freshly ground black pepper
  • 1/2 cup extra-virgin olive oil
  • 1/2 cup dry white wine
  • 1 tablespoon all-purpose flour
  • 2 cups canned chicken or beef broth

DIRECTIONS

Preheat the oven to 350 degrees F.

Lay the beef in a large roasting pan with the bone side down. (The ribs act as a natural roasting rack.) In a small bowl mash together the garlic, horseradish, rosemary, thyme, salt, pepper, and olive oil to make a paste. Massage the paste generously over the entire roast. Put the pan in the oven and roast the beef until the internal temperature of the meat registers 125 degrees F on an instant-read thermometer (medium-rare), 1 1/2 to 2 hours. Remove the beef to a carving board and let it rest for 20 minutes before carving.

Pour off some of the pan drippings and place pan on stovetop over medium-high heat.
Add the white wine and bring to a simmer, scraping the bits on the bottom of the pan. Reduce the wine by half. Whisk in the flour, then add the broth and continue to cook, whisking until sauce thickens into a gravy, about 10 minutes.

Source: My brother’s recipe so no clue!

REVIEW

My brother, Joe, has made this for large family gatherings, especially on New Year’s Day. He is a fantastic cook! More importantly, he is a beloved uncle to my children and one of my favorite people to ever exist. His prime rib with mashed potatoes and an amazing French onion soup that everyone raves about to this very day.

Delicious Hoisin BBQ Pork Chops Recipe


INGREDIENTS

SAUCE:

  • 1 jar hoisin sauce (8 ounces)
  • ½ cup honey
  • ½ cup chicken broth (or water with bullion)
  • ¼ cup chili garlic sauce (or sriracha)
  • ¼ cup rice vinegar
  • 2 tablespoons soy sauce
  • 2 tablespoons toasted sesame oil
  • 2 tablespoons garlic, minced
  • 2 tablespoons fresh ginger, minced
  • 1 teaspoon red pepper flakes

MAIN:

  • 2 tablespoons of vegetable oil
  • salt & pepper, to taste
  • 8 boneless porkchops

INSTRUCTIONS

1. Combine first 10 ingredients for the BBQ sauce; mix well.
2. Heat the veg. oil in a large skillet over medium-high heat.
3. Season boneless country ribs (if using crockpot; see notes below) or boneless chops with salt and pepper.
4. Sauté the meat until browned on all sides, about 5 minutes.
5. Add half the BBQ sauce and bring to a boil.
6. Reduce heat to medium-low, cover and allow to cook for 15 minutes.
7. Flip pork, cover and continue to cook for an additional 15 minutes.
8. Add the rest of the BBQ sauce and continue to cook uncovered for another 15 minutes.
9. Serve over rice.

Optional: Garnish with chopped green onions.

NOTES

*This recipe could easily be adapted to a crock pot. Follow steps 1 – 4. At this point, remove pork from the skillet and put it into a crock pot. Pour the sauce over the top and cook on low for 4-6 hours. The meat will be fall-apart tender. Serve over rice.

This is one of Zach’s favorites that I located from an old blog that I had kept when they were growing up. I will make soon & replace the blog-generated image. I hope it holds up to our memory of this dish!

Scrumptuous Instant Pot Crispy Pork Carnitas (Recipe)

Recipe Highlight: I recently stumbled upon this amazing instant pot recipe from Gimme Some Oven. This recipe is for pork carnitas that are cooked in the instant pot in a flavorful sauce and then finished off under a broiler so that the sauce evaporates and concentrates into each delicious bite of caramelized pork.


Link: https://www.gimmesomeoven.com/instant-pot-crispy-carnitas/


Please click on the link above for the original recipe.

The original recipe consists of detailed instructions for both the instant pot carnitas and a mojo sauce. The recipe below includes the changes I made due to personal taste or availability of ingredients based on what I had in my pantry at the time. 

If you use the recipe below, let me know how you feel about these changes!

PORK:

  • 4-5 pounds of lean, boneless pork, trimmed & cut into chunks
  • salt & pepper (to generously season pork)
  • 1 Tbsp oil of your choice
  • 1 batch of sauce (see below)

SAUCE:

  • 2 cups of water or chicken broth
  • 1 Tbsp chicken bouillon (if using water instead of broth)
  • 1/2 cup lime juice
  • 1/2 a large red bell pepper 
  • 1 whole jalapeno, top removed (can remove seeds if sensitive to heat)
  • 1/8 tsp cayenne pepper (can remove seeds if sensitive to heat)
  • A fist full of cilantro (measure by your heart)
  • 1 Tbsp ground cumin (measure by your heart)
  • 1 Tbsp dried oregano (measure by your heart)
  • 1 tsp kosher salt
  • 1/2 tsp black pepper
  • 1 Tbsp brown sugar

INSTRUCTIONS:

  1. Make your sauce by tossing all the ingredients in a blender and combining. Set aside.
  2. Sear your seasoned pork in the oil of your choice by using the “sauté” feature on your Instant Pot.
  3. Once all sides of your pork is browned, add your sauce to the seared pork.
  4. Cook on high pressure for 30 minutes, followed by a natural release.
  5. Once the pork is cooked, shred the pork using two forks.
  6. Line a baking sheet with foil and turn on the oven’s broiler.
  7. Evenly spread the shredded pork with the sauce onto the lined baking sheet, broiling for about 5 minutes before removing from oven and stirring. Repeat the process until you have reached desired crispiness and most of the sauce has absorbed into the meat. I believe it took me about 3 cycles. This will ensure a deliciously concentrated flavor and caramelized, crispy edges that are simply to die for!
  8. Serve warm as tacos, burritos, quesadillas, rice bowl … etc.

NOTES:

This recipe is definitely worth the effort of lugging your instant pot out of the forgotten corner in the pantry.

I served these mouth-watering morsels of crispy pork over Mexican rice with black beans and topped with sour cream, a squeeze of lime juice, and additional cilantro. My family made quesadillas with the carnitas, and I can’t imagine how amazing they would taste served traditionally in corn tortillas.

Choose your own vehicle for these unforgettable carnitas … I won’t judge!

Stay tuned for a photo of my spin on this delicious dish! The next time I summon up this mouth-watering meal in the kitchen, it’s photo shoot time! In the meantime, head over to the link provided for the original recipe and stunning photos of this hearty meal that is sure to grace your table (or at the very least your thoughts) again and again.

Burrito? Taco? Quesadilla? Pick your pleasure!

Moroccan-Spiced Lentils: A Flavorful Plant-Based Delight (Recipe)

Recipe Highlight: I recently stumbled upon this amazing recipe from Minimalist Baker for Saucy Moroccan-Spiced Lentils that were simply to die for! The sauce is so flavorful and delicious, and I could not help but think of all the different ways I will use the delectable sauce in the future!


Link: https://minimalistbaker.com/saucy-moroccan-spiced-lentils/


Please click on the link above for the original recipe.

The recipe below includes the changes I made due to personal taste or availability of ingredients based on what I had in my pantry at the time. I doubled the ingredients in the sauce, naturally! MORE SAUCE!

If you use the recipe below, let me know how you feel about these changes!

LENTILS

  • 1 cup raw green lentils cooked per instructions on bag

SAUCE

  • 3 whole cloves of garlic (or to taste)
  • 1 medium onion 
  • 2 large red bell pepper (or use 4 small), seeds removed, roughly chopped
  • 2 Tbsp tomato paste (I use Trader Joe’s from the tube!)
  • 2 Tbsp sorghum syrup (or whatever sweetener you prefer)
  • 1 tsp sea salt (plus more to taste)
  • 2 Tbsp smoked or sweet paprika (plus more to taste)
  • 2 tsp ground cumin (plus more to taste)
  • 1 tsp ground coriander (plus more to taste)
  • 2 tsp ground ginger (plus more to taste)
  • 1 tsp ground turmeric (plus more to taste)
  • 1 tsp cayenne pepper (more or less to preferred spice level)
  • 3 Tbsp lime juice
  • A whole bunch of fresh chopped cilantro (to taste)

INSTRUCTIONS

  • Cook 1 cup of raw lentils per package instructions. I started out with 2 cups of boiling water per 1 cup of raw lentils, adding water throughout the process to keep the lentils cooking until they reached desired texture. I prefer them softer but not mushy.
  • Add sauce ingredients to a blender and combine thoroughly.
  • Taste and adjust for flavor before setting aside.
  • Add sauce to the drained mixture until warmed through and serve over rice. I top with sour cream, a squeeze of lime juice, and a garnish of cilantro.

NOTES

I love plant-based meals! But let’s talk about the sauce …

I would pay to drink the sauce straight from a tap. Inject it in my veins! I am so excited to use this sauce in every way imaginable. If you like to walk on the wild side, play around with the heat levels by adding a touch of ground cayenne or crushed piri piri pepper flakes. You won’t regret it!

Stay tuned for a photo of my spin on this delicious dish! The next time I summon up this mouth-watering meal in the kitchen, it’s photo shoot time! In the meantime, head over to the link provided for the original recipe and stunning photos of this hearty meal that is sure to grace your table (or at the very least your thoughts) again and again.

Do you have a lentil recipe that you love? Let me know in the comments below! I’d love to try it.

A trip to: Pickwick Lake & Shiloh Battlefield

Sundays are for sleeping in. PERIOD!

Yesterday we visited the Wolf River Greenway, which was all we had planned to do over the weekend. I usually proclaim Sundays as my “rest” day and organize for the week ahead. However, still riding high with enthusiasm for our endeavor to adopt an outdoors-focused active lifestyle and crush our fitness goals, all promises to do absolutely nothing with our Sunday flew out the window when my brother called and asked if the kids and I wanted to go swimming at a lake on Sunday.

Absolutely. Are you kidding me? I mean, it’s SWIMMING! And who turns down an opportunity to get in a little bit of sun worship?!

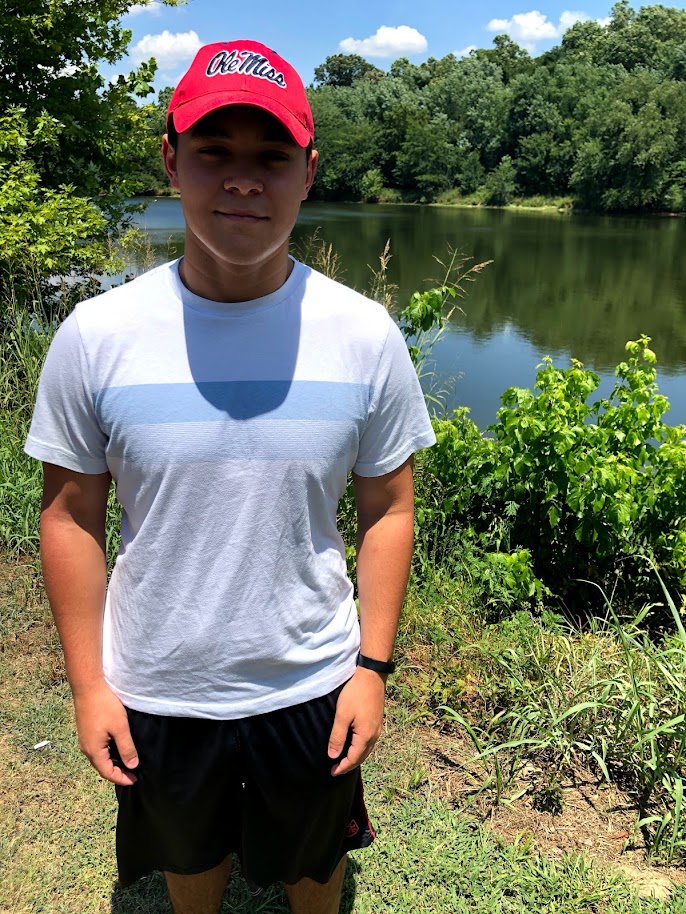
It turns out that the answer to that question is my oldest son and my daughter. My oldest son was sad to miss out, but he had to work. My daughter declined as she takes her beauty sleep seriously, and I do not hold that against her at all! That meant that, just like Saturday, it was me and my 17 year old son. Surprisingly, my mother wanted to go, too!

But where?

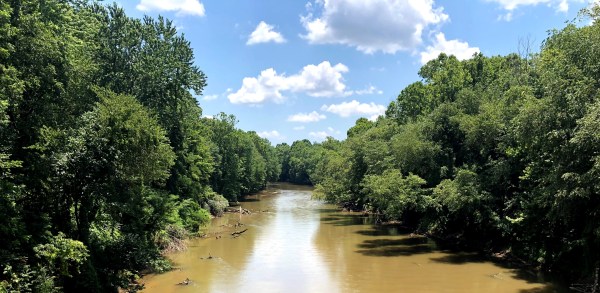
Our usual muddy swimming hole located is Sardis, MS. It is one of two lakes we frequented as a family when I was growing up, and I have shared the love of our favorite picnic and camping spot with my own children. It is a safe space full of shared nostalgia, even if the lake water is a muddy brown and akin to swimming in warm pee.

Ah, memories.

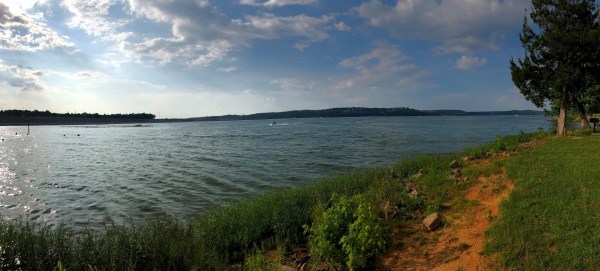
My brother and I were torn on whether to return our usual spot or try something new. On a whim, we decided to head to Pickwick Lake around an hour and a half away. We were promised clear water, and that is all it took.

Pickwick was not what we expected, but I feel like that was because — again, much like yesterday — we did not do our due diligence to research the best location to settle in for the day. We entered the park in Counce, TN. I think?

Due to the pandemic, we had certain standards that our site had to abide by, namely that socially distancing was possible, and some of the beach areas were entirely too crowded to meet those expectations. We did end up finding a smaller swimming hole with less people with a really great picnic spot by the water, but the beach area was almost as muddy as the lake we usually visit and just as warm. For some reason I thought Pickwick was a spring-fed lake, and I expected much a much cooler welcome than the water gave me.

Either way, we swam. And roasted hotdogs and marshmallows over a fire. And just enjoyed being outdoors, even in the 100 degree heat. No regrets.

As we ended up getting a much later start than we anticipated, we were not able locate any hiking trails, but that just means we have a reason to go back, and I do think we will. The park has cabins, pontoon boat rentals, and even an updated Inn with indoor/outdoor polls, but mostly I want to go back and find this waterfall and rope swing I keep hearing about in Yellow Creek Cove.

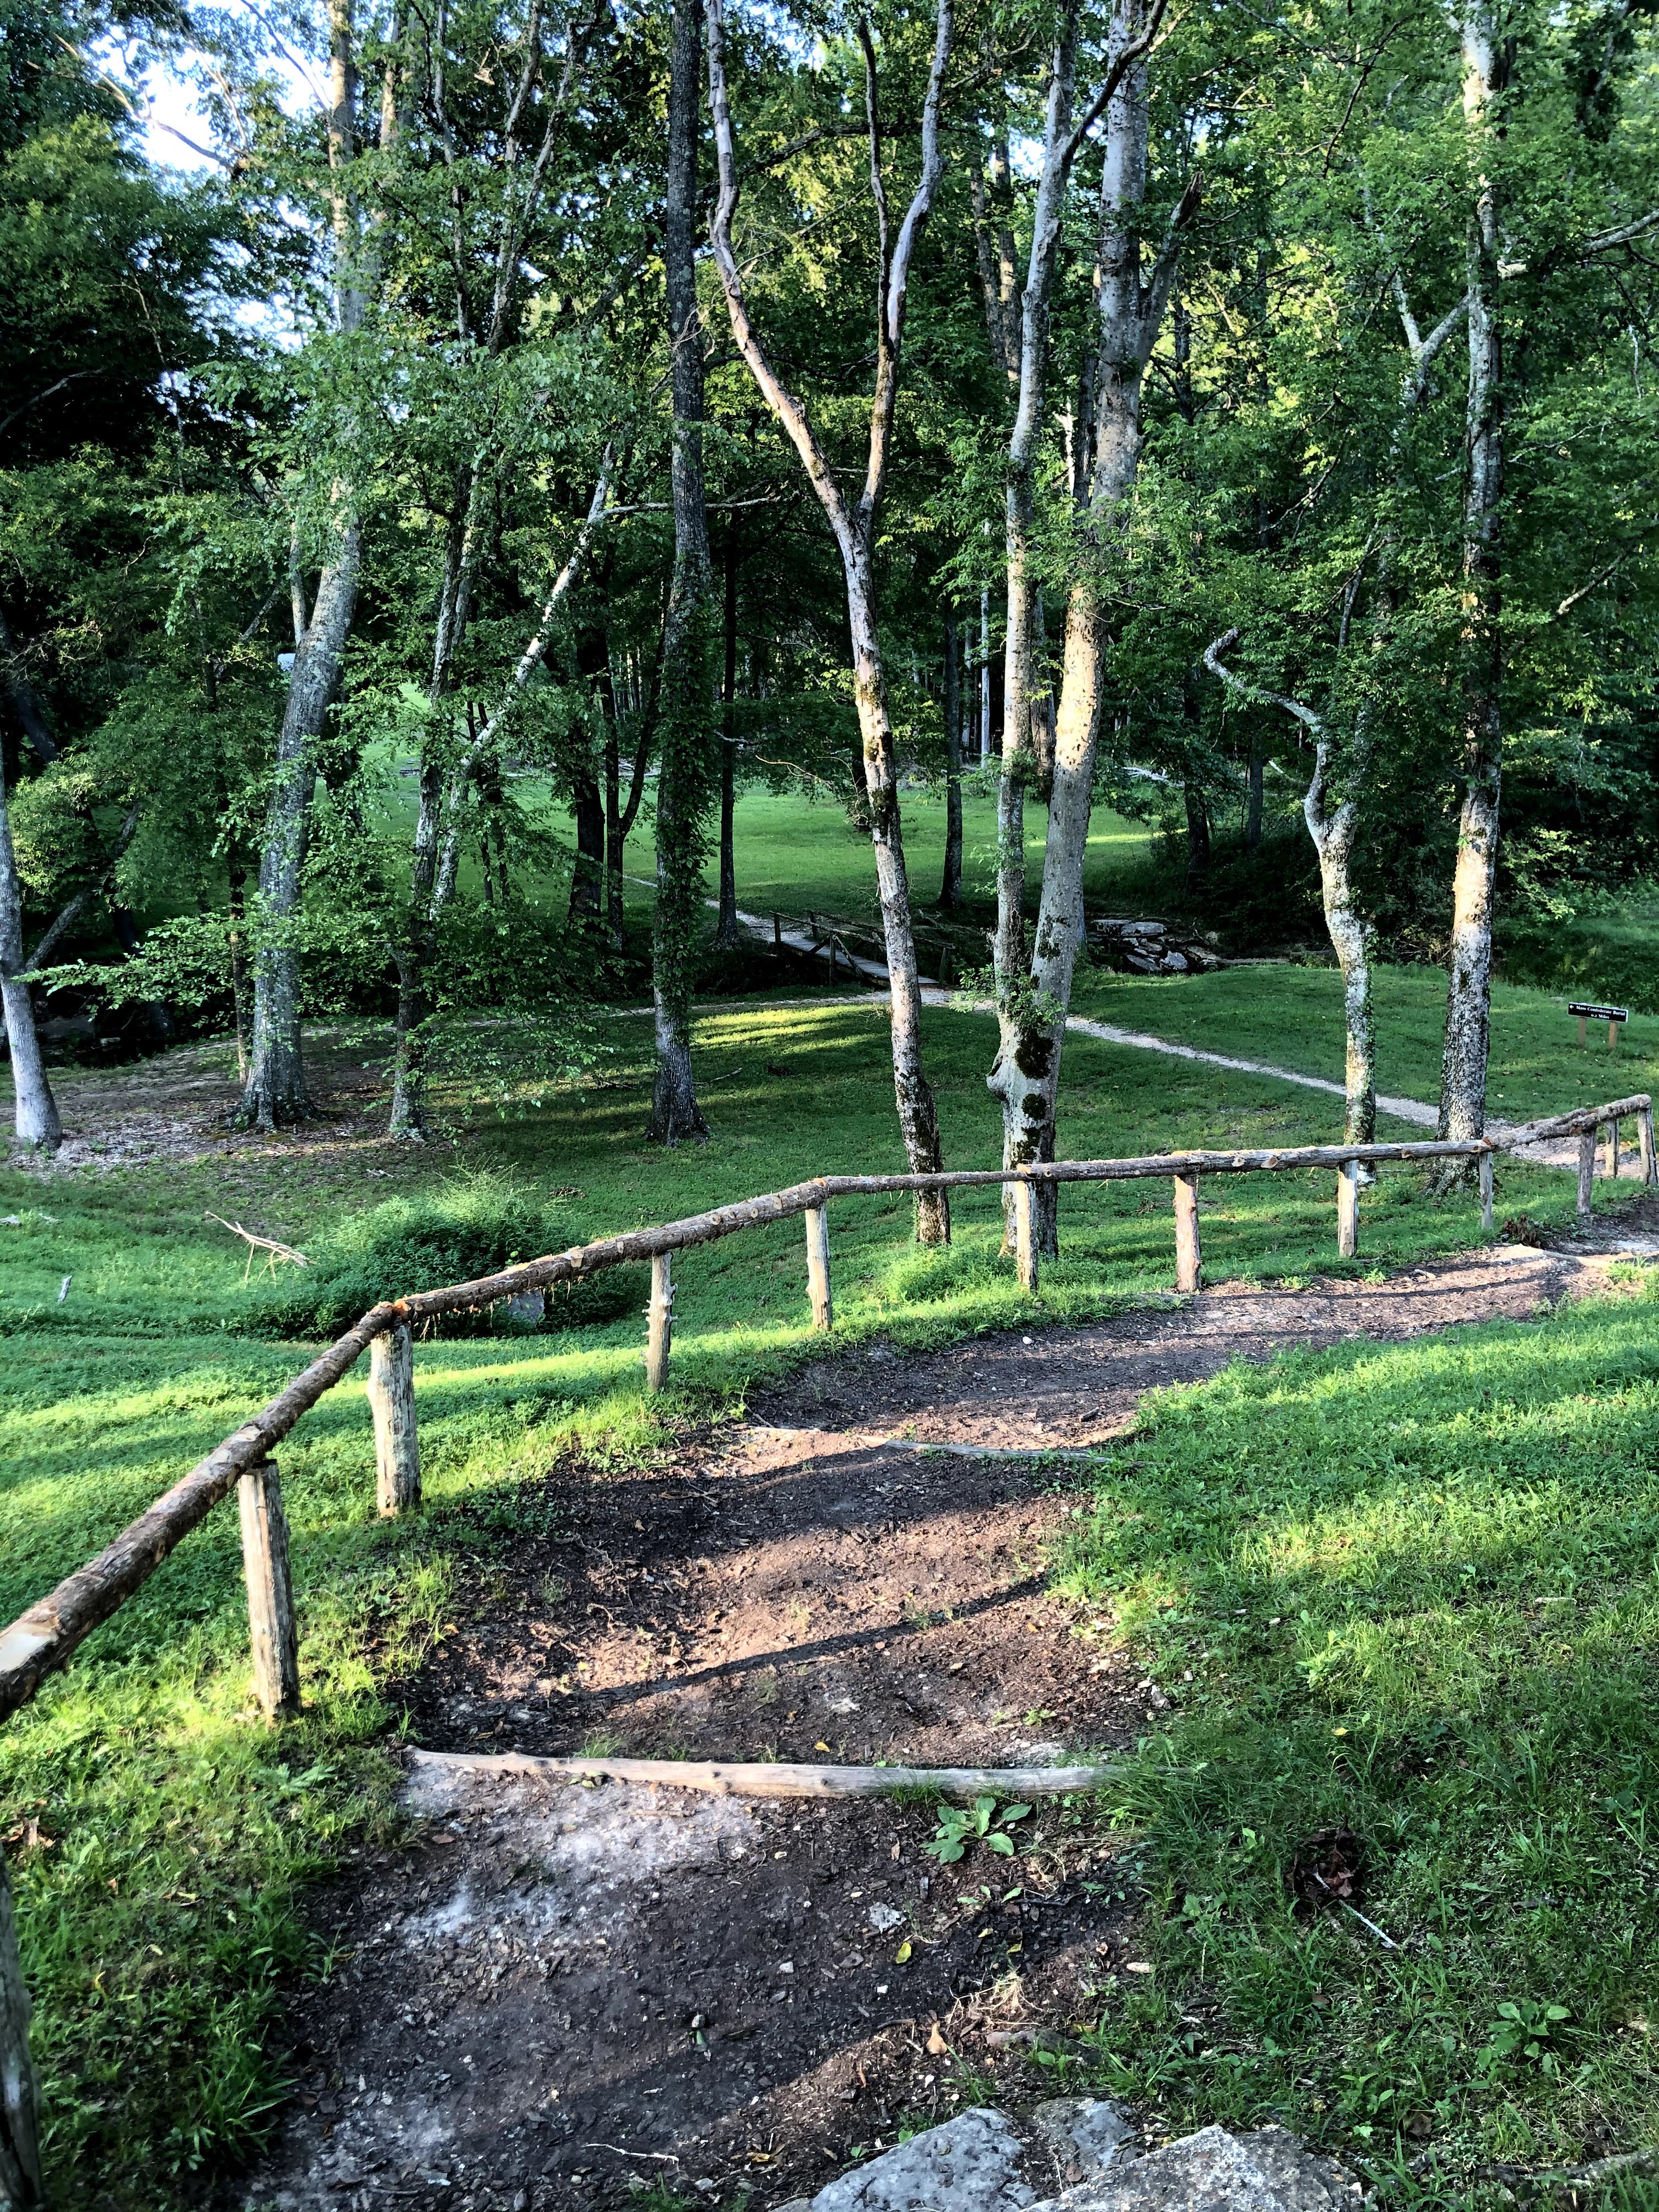
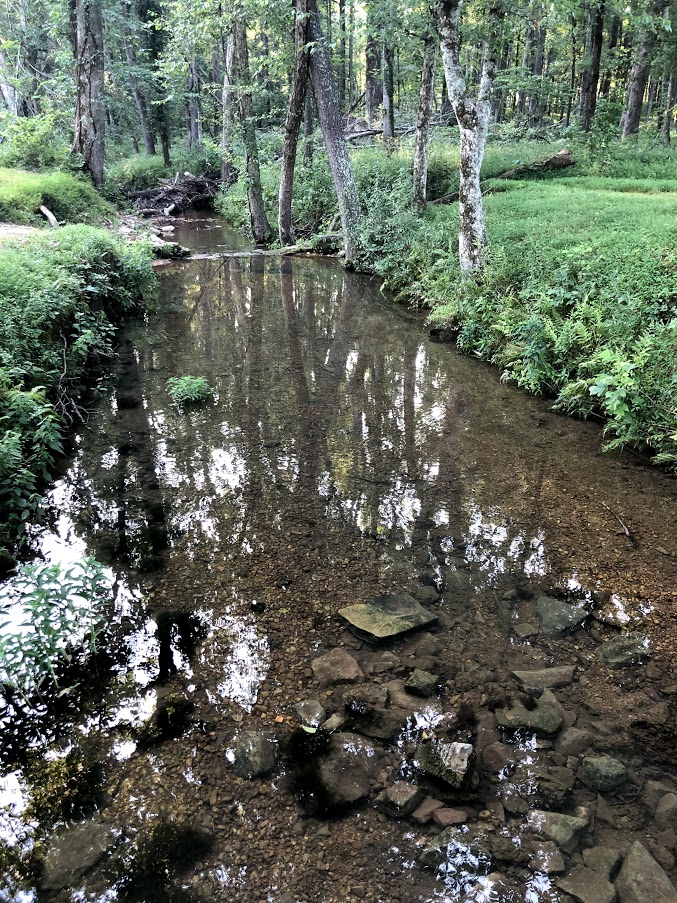
Nearby Pickwick Lake is the Shiloh National Military Park. The park is a 5,000 acre battlefield with various statues, landmarks denoting military conflicts, and cemeteries. The cemeteries, mass Confederate graves, and Native American burial grounds are a somber backdrop to a stunningly beautiful drive along tree-lined paths surrounded by the occasional sunny meadow full of deer and turkey.

A quick walk down to a bubbling spring and we were surrounded by Mother Nature’s whispers, both eerily quiet and a cacophony of life. The swiftly moving water, the singing insects, the rustle of leaves as animals made their way through the surrounding brush. We held our breath and listened for the ghosts of the past, imagining the darkness that would envelop these woods once the sun went down, and turned out face to the skies, yearning to see the stars that we both knew were hidden by the blue skies above.

As a pacifist, I do not like to romanticize war, and as a Mississippi progressive, I seriously doubted that a visit to a Civil War battlefield would be enjoyable for me, especially as someone who loves the South but is ashamed of its unwillingness to move beyond its Confederate past.

However, as a nature lover, it was the perfect way to end our day. It was a beautiful backdrop that provided me an opportunity to continue an ongoing conversation I have with my son regarding the South’s past and present, however similar they may seem at times, as well as the part that we could play in shaping its future.

As a family, we often grow so very weary of being what feels like a tiny Blue dot in a Red state, and oftentimes we fantasize about moving elsewhere to leave behind the weight of racism, oppression, and injustice that the powerful in this state seem so determined to continue forcing its citizens to struggle beneath. However, there is dignity in appreciating the scenic beauty and genuine charm of the South while condemning its racist history and fighting for real change.

There are injustices here worth fighting against, ideals worth fighting for, and people worth fighting alongside.

For better or for worse, this is my home.

A trip to: Wolf River Greenway

So yesterday was our first documented adventure!

The players for today’s trek? Just my 17 year old son and I! My oldest son had to work, and my daughter just couldn’t muster enthusiasm for physical activity early on a Saturday morning, which I respect!

As we are in the middle of a pandemic, the kiddo and I decided to keep it local despite always being up for a road trip. We wanted to be confident that our first exploration location — masks handy should they be required –would allow safely practice social distancing while still enjoying ourselves in mid-day Memphis weather.

Enter the Wolf River Greenway.

Per their website:

The Wolf River Greenway is a corridor of protected green space along the Wolf River that includes a paved pathway for non-motorized transportation. Built in phases, this 10-foot and 12-foot wide pathway will eventually extend a total of 36 miles to connect neighborhoods all the way from the north end of Mud Island, in downtown Memphis, through the neighborhoods of north central Memphis, connecting to Shelby Farms and then to the cities of Germantown and Collierville, Tennessee.

https://wolfriver.org/the-wolf-river-greenway

A beautiful yet sweltering day was in store for my son and I as we entered the Greenway East access point. We decided to wing it, and while we did have a wonderful time, I wish I had researched the various sections of the Greenway and made a clear plan for our walk. The trails are a mix of asphalt and dirt, both with bike traffic, and we made the mistake of choosing to stay on an asphalt path that let us straight into a sunny meadow with no means of escaping the Southern summer heat.

Also: Construction.

As you can see from this picture [ pic removed ] taken about 30 minutes AFTER we had left the trail to escape into the air conditioned sanctuary of my home-bound vehicle, the sizzling mid-day heat was unforgiving.

I think we made it just over a mile into our walk before I realized that I, greatly overestimating my fitness level, had fallen prey to hubris. I was not going to make it anywhere near the distance I had anticipated before stepping on the trail.

We eventually did find areas where the trees lined the asphalt path, shading us from the torment of the sun, and I took every available opportunity to sit beneath those trees and recover before managing the meager mile back to the park entrance.

I was red-faced with both heat exhaustion and humiliation.

I am so grateful that my son — who is in the best shape of his life and didn’t get to fully appreciate our outing because my body held us hostage — is so supportive and patient, but I know that I have a lot of work to do. Improving my fitness level needs to be priority number one!

Thankfully, the lack of mileage did not diminish the quality of the conversations that my son and I were able to make during our walk. It means so much when I am able to connect to both nature and my children in such a meaningful way. Hearing his musings about the world we live in and how we, as a family, fit into it? My heart was so full it could burst!

Overall, if this location a review, I would give Wolf River Greenway kudos for being wheelchair accessible, clean, beautiful, and perfect for those of all fitness levels who wish to be active outdoors while responsibly socially distancing. We have a lot more to explore (obviously), and I will definitely go back. However, I will definitely plan out my desired route and be better prepared for the heat. I will start seriously working on my fitness level this week by taking daily walks after work. I will also continue to make better fitness choices.

I hope to go back soon and see progress. Perhaps one day I will be in good enough shape to give this beautiful green-space the attention it deserves.

Create a website or blog at WordPress.com

Up ↑