Waitress’s In-the-Dark Dark Chocolate Pie

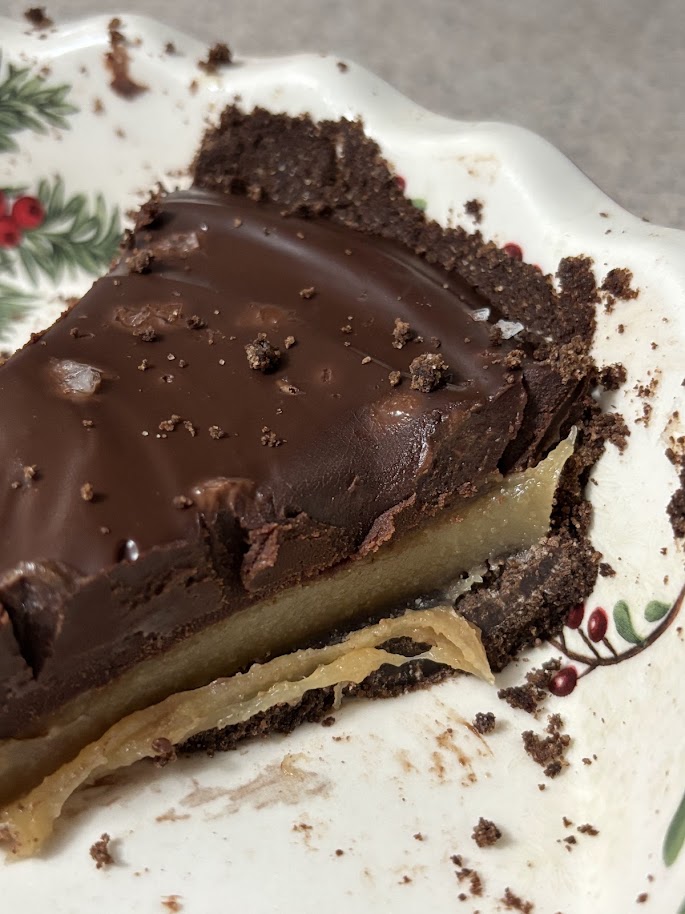
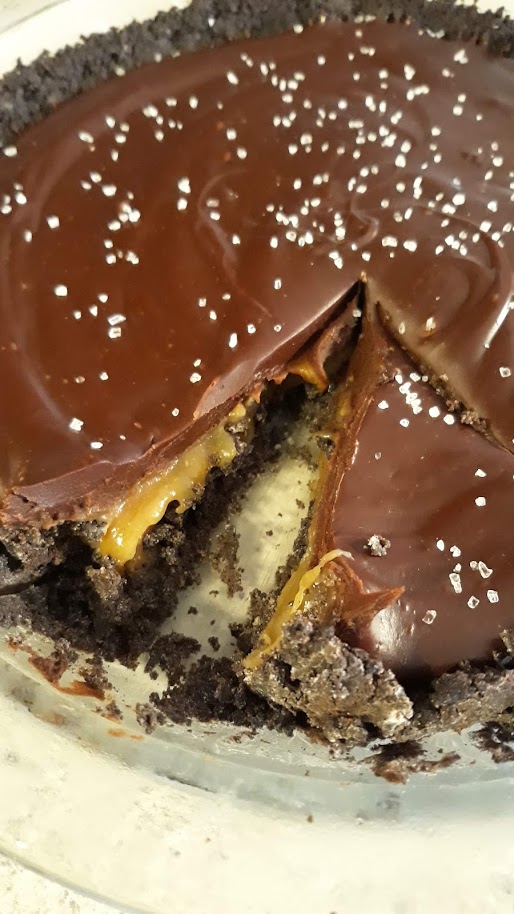
Original recipe: Salted Caramel Dark Chocolate Pie — The BEST Chocolate Pie Ever!!

INGREDIENTS

Crust:

  • 1 package (about 36) whole Oreos
  • 1 stick (8 tablespoons) butter (*will need additional butter for the filling)

Caramel filling:

  • 1 stick (8 tablespoons) butter
  • 2/3 cup packed brown sugar
  • 1/4 cup heavy whipping cream (*will need additional cream for ganache)

Ganache topping:

  • 1 cup of heavy whipping cream
  • 1 (12 oz) bag dark chocolate chips
  • Flaky salt like kosher salt or fleur de sel

INSTRUCTIONS

  • Finely crush the Oreos with a food processor or blender. Stir crumbs together with 8 tablespoons melted butter until well combined. Press into the bottom and sides of a pie pan. Freeze crust for 10 minutes until set.
  • Combine remaining 8 tablespoons butter and brown sugar in a small saucepan. Cook over medium heat, whisking constantly, until mixture begins to bubble. Continue cooking, whisking constantly, for 1 minute. Remove from heat. Slowly whisk in 1/4 cup heavy whipping cream until smooth. Cool caramel about 15 minutes. Pour the caramel over the Oreo crust, then return to freezer for about 30-45 minutes until just chilled and set. (You don’t want the caramel to fully freeze.)
  • Place chocolate chips in a glass bowl. In a saucepan, bring 1 cup heavy whipping cream to a simmer over medium-high heat. Pour the cream over the chocolate chips and let sit for 5 minutes, then whisk until completely smooth. Pour the chocolate over the caramel and freeze for a final 30 minutes, until just chilled and set. OR refrigerate, covered, until ready to serve. Before serving, sprinkle the top with a flaky sea salt like kosher salt or Fleur De Sel.

NOTES

I first tasted this delectable pie at a national tour of the Broadway musical Waitress in St. Louis. They were selling small jars of various pies prior to the show. The layers of caramel and ganache with a hint of salt made my toes curl. It has been a family favorite for special events ever since!

Feel free to bypass a step and buy a store-bought chocolate crust, if needed. However, you will really be missing out as the homemade Oreo crust really adds heft and structure to this amazing pie.


Pecan Pie Bars

Original recipe: Pecan Pie Bars Recipe – Preppy Kitchen

INGREDIENTS

Crust:

  • 2½ cups all-purpose flour (300g)
  • ¾ cup granulated sugar (150g)
  • ½ teaspoon salt
  • 12 tablespoons of butter (170 g), browned

Filling

  • 4 large eggs
  • 1½ cups dark or light corn syrup (360mL)
  • ⅔ cup packed brown sugar (140g)
  • 1 tablespoon vanilla extract
  • 1 teaspoon salt
  • ⅓ cup all-purpose flour (40g)
  • 2 cups pecans roughly chopped (240g)

INSTRUCTIONS

  • Preheat the oven to 350°F.
  • Spray a 9×13-inch baking dish with nonstick spray then line it with parchment paper or foil.
  • Brown the butter for your crust.
  • In a large bowl, whisk to combine the flour, sugar and salt. Drizzle in the browned butter and stir together with a fork. Use clean hands to mix and knead the dough together (it will be crumbly) then place it in the prepared baking dish. Press it into a thin, even layer.
  • Bake for 15 to 20 minutes or until the edges turn lightly golden.
  • While the shortbread crust bakes, in a large bowl, whisk to combine the eggs, corn syrup, brown sugar, vanilla and salt until smooth. Sift in the ⅓ cup flour and whisk to combine. Add the chopped pecans and mix once more.
  • When the crust comes out of the oven, pour the pecan pie topping over it and smooth out any piles of pecans. Return it to the oven for about 30 minutes or until the topping is puffed and dry.
  • Allow to cool completely and then chill slightly before cutting, in order to get nice clean pieces.

NOTES

This is it. The best of the best. Move over pecan pie, this is the one thing that my kids have decided they must have every Thanksgiving and Christmas. The rich shortbread crust and the luscious filling are absolutely to die for!

Please check out the original recipe linked above. For a step-by-step walk through, check out the embedded video below.


Ritz Peanut Butter Crack Sammies

INGREDIENTS

  • Ritz crackers
  • Almond bark (at least 3 squares)
  • Peanut butter (or spread of your choice such as almond butter, cookie butter, Nutella, melted Rollo, etc.)
  • Toppings of your choice (see notes)

INSTRUCTIONS

  • Decide how many treats you wish to make and make sure you have 2 Ritz crackers for each.
  • Spread peanut butter on half the crackers.
  • Prepare any toppings you may have for easy access is the next steps will have to take place quickly to ensure that the toppings are able to be placed on almond bark coating before it hardens.
  • Melt almond bark and spoon a small circle of warm, liquid almond bark on a parchment paper lined baking sheet.
  • Immediately place the cracker with peanut butter directly on top of the almond bark so that it will form a coating on the cracker for a bottom.
  • Quickly do this for every bottom half of your treats.
  • Once all the peanut butter topped halves have been placed atop their corresponding almond bark circle, place the remaining cracker half on top of the peanut butter to form your cracker sandwich.
  • Using a fork or other utensil, drizzle remaining almond bark on the top of your cracker sandwiches.
  • Immediately top with any toppings you may prefer. For me, that is some honey roasted almonds that I pulse in a blender or food processor, a few sprinkles, and a chocolate chunk or chopped candy bar that I may have on hand.
  • Place in refrigerator to set and then enjoy!

NOTES

This is not so much a recipe than a treat that is made whenever I’m trying to use up leftover almond bark, usually after making Audrey’s Oreo Truffles. The ingredients are never the same … just a mixture of delicious things I have on hand at the time. However, the ingredients pictured (crushed honey roasted almonds, a few sprinkles, and a chopped mini Hershey bar) is one of my favorite combinations! They are addictive and honestly worthy of making on their own, especially for Halloween. See below for how to decorate them for a spooky mummy treat!


Create a website or blog at WordPress.com

Up ↑