Progress Recap: Days 17 thru 30 (24 miles)

  • Pounds lost to date (since 2/21/26):17.6
  • Pounds lost since previous update (3/8/2026): 8.4
  • Pounds left until 1st goal (235 lbs): 60.4

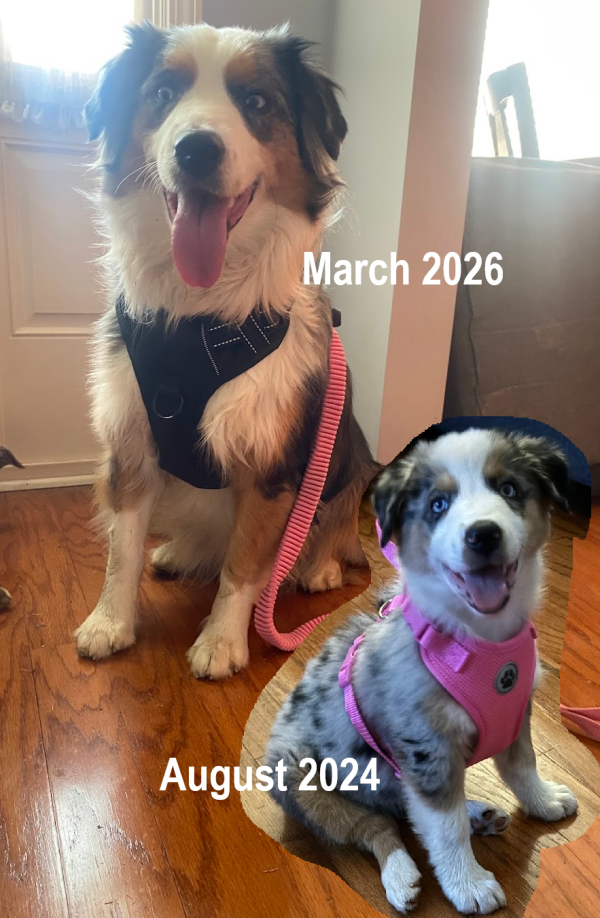
The little lady in that before & after picture posted above? She has changed me.

What will they look like soon?

There are many quotes about the inevitability of time passing, about how change is inescapable. I can’t help but look at how much Juno has grown over these many months (or look into a mirror!) and see a living testament to the relentless march of time. Regardless, Juno will always be that same sweet baby that I brought home in 2024, all mischievous smiles and boundless energy (just as I will always be that young girl with dark hair).

And while she may still have the same goofy smile and ceaseless enthusiasm, Juno has also grown into a beautiful companion. Both Juno and Willow (still a puppy!) have brought ceaseless joy and levity to my life.

Spring may have sprung, but the clouds bring winter back with them this week

In an attempt to return the favor and keep the girls happy, I spend a lot of time in my beloved outdoors. When not taking walks to improve my mobility or hitting the gym to increase my strength and endurance, I’m outside. I’m throwing frisbees, tossing Chuck-Its, or kicking the herding ball. Indoors, I’m chasing the little devils down to retrieve the sock that they stole from my bedroom laundry basket or playing tug with them on the floor. I’m golden from the sun, grateful to fall into an exhausted sleep each night, and I’m … happy.

Each day, I’m able to be more present for everyone in my life, especially the puppies. As such, I keep chugging along in my efforts towards better health, and I look forward to my own progress pictures one day. After all, time will pass either way so I may as well make changes for the better.

And the changes I’ve made these past two weeks since my previous update? I was able to knock off just over 8 pounds! That brings my total lost to 17.6 pounds with 60.4 to go until my first goal of 235 pounds. Not to mention the 24+ miles that I put in. This wagon continues to move forward, and I am doggedly determined not to fall off it.


Progress Recap: Days 1 thru 16 (16 miles)

  • Pounds lost to date (since 2/21/26): 9.2
  • Pounds left until 1st goal (235 lbs): 68.8

Spring has sprung.

It’s been a rollercoaster of a two weeks. I started off strong before severely injuring my foot. Curse you, plantar fasciitis. The worst part? Witnessing the beginning of what looks like to be another horrifying, unwinnable war in the Middle East. Did I eat my feelings about the latter for a hot minute? Absolutely. It took me throwing myself against the wall for days before nailing the landing, locking in, and getting back on track. All this to say is that I’m down just over 9 pounds, so I’m giving myself tens across the board!

Strava shows me walking about 16 miles these last few weeks, and considering my injured foot meant my training log took a big hit for about four days, I will take it!

There are stories to be told about Willow running away from me after ignoring her recall while on a hiking trail at our local off-leash dog park, but I don’t think my blood pressure can handle the retelling. Needless to say, she has some things to continue to work on. I do as well, so I’m putting my head down and will simply continue doing the work.

Juno gets to keep her “Best Dog Ever” title, I guess. For one more week anyway …


Current mood:

Suki, the diva

Audrey’s Favorite Glazed Orange Scones Recipe

Recipe Highlight: https://www.mybakingaddiction.com/glazed-orange-scones/

Makes 8 scones.

INGREDIENTS

Citrus-infused sugar:

  • 1/3 cup sugar
  • zest of two medium oranges

Scones:

  • Citrus-infused sugar (see above)
  • 2 cups all-purpose flour
  • 1 teaspoon baking powder
  • 1/4 teaspoon baking soda
  • 1/2 teaspoon salt
  • 8 tablespoons unsalted butter, frozen
  • 1/2 cup sour cream
  • 1 egg

Glaze:

  • 3 tablespoons unsalted butter melted
  • 1 cup confectioners’ sugar sifted
  • ½ teaspoon pure vanilla extract
  • 2 tablespoons freshly squeezed orange juice

INSTRUCTIONS

  1. Adjust oven rack to lower-middle position and preheat oven to 400°F. Line a baking sheet with parchment paper.
  2. In a medium bowl, make your citrus-infused sugar mixture by combining sugar and orange zest and mixing with your fingertips. Really get in there and mix the zest and sugar between fingertips until the oils are released from the zest! You will know you are there when the sugar is moistened and fragrant. Let the mixture sit on counter for at least 30 minutes to fully infuse flavors if you want to maximize the flavor, but waiting is not a required step.
  3. To the citrus-infused sugar, add in the flour, baking powder, baking soda and salt and mix until combined.
  4. Grate butter into flour mixture on the large holes of a box grater; use your fingers to work in the butter until the mixture resembles coarse meal.
  5. In a small bowl, whisk the sour cream and egg until smooth.
  6. Using a fork, stir sour cream mixture into flour mixture until large dough clumps form. Use your hands to press the dough against the bowl into a ball. The dough will be sticky first, but as you press, the dough will come together.
  7. Place on a lightly floured surface and pat into a 7-inch circle about 3/4-inch thick. Use a sharp knife to cut into 8 triangles; place on prepared baking sheet, about 1 inch apart. Bake until golden, about 15 to 17 minutes. Cool for 10 minutes and prepare the glaze.
  8. In a medium bowl, prepare the glaze by mixing together the melted butter, confectioners’ sugar, vanilla and orange juice. Whisk until smooth. Dip the top of the scones into the glaze and allow the glaze to harden. Double-dipping is best!

NOTES

Kiddos: I love you so much! Please visit the link provided to the original recipe for pictures of the process used in making these amazing scones. As stated in the original recipe, these scones are peak when double-dipped in the glaze. We’ve added cranberries to this recipe, as well as subbed lemon for the citrus and using diced fresh strawberries. I’ve always wanted to do the same with blueberries. The sky is the limit! The base recipe is FANTASTIC, and these scrumptious scones are a great addition to any day! Enjoy!

Quick and Easy Sandwich Buns Recipe (Bread Machine)

Recipe Highlight: This is the absolute BEST recipes for sandwich buns or rolls that you can possibly make in a hurry! In less than 3 hours total, you can have amazingly soft bread that are especially delicious for burgers or chicken sandwiches! I can’t wait to use them for breakfast sandwiches as well. The slightly sweet, yeasty dough yields a crowd pleaser … for sure!

Makes 6 to 8 buns.

INGREDIENTS

  • 1 large egg
  • 1/2 cup of milk (4 ounces)
  • 1/4 cup water (Approximately 2 ounces … just enough until the totality of the 1st three ingredients equals 8 ounces. See instructions.)
  • 2 tbsp granulated sugar
  • 3/4 tsp salt
  • 2 tbsp softened butter
  • 2-1/2 cups (340 grams) of All-Purpose Flour
  • 1-1/4 tsp bread machine or quick rise yeast

INSTRUCTIONS

  1. Using a food scale, add 4 ounces of milk to a bowl. Then add egg. From there, add just enough water so that the total liquid mixture is 8 ounces. Using the cup measurements provided is pretty on point if you don’t have a food scale.
  2. Add salt and sugar to the liquid mixture and stir until egg is
  3. Add liquid mixture to bread machine, adding your softened butter and AP flour in order listed.
  4. Make a well in the top of the dry mixture and place your yeast on top.
  5. Using the DOUGH setting on your bread machine (our current model is #8 on the setting menu), allow your machine to do the hard work for you! It will mix the dough and proof it, a process that takes around 1-1/2 hours.
  6. Once dough has completed this process, turn out dough onto a lightly floured surface and divide into 6 to 8 dough balls. Once rounded out, place on a parchment lined baking sheet. Lightly press each ball with floured fingertips until they are around 1 inch tall.
  7. Let dough rest in a warm environment for about 45 minutes so that they can complete their final rise. If you don’t have warm proofing area, putting the rolls into an oven that has been preheated for a minute and a half and then leaving the oven light on works perfectly!
  8. Once rise is complete, preheat oven to 400 degrees.
  9. If desired, brush tops of rolls with egg whites and then sprinkle with sesame seeds or topping of your choice.
  10. Bake for around 12 minutes or until tops are beautifully brown.
  11. Allow rolls to cool for at least 15 minutes.
  12. Once cooled, cut horizontally and top as desired!

NOTES

For my kiddos: Enjoy! I hope that these buns elevate your sammies! These are so tasty! Just know that I love you more than homemade bread … and that says A LOT!

Ultimate Spicy Chili Recipe for Snow Days

This is a must-have for any snow day!

INGREDIENTS

  • Olive oil
  • 1 yellow onion (or 4 shallots)
  • 1/2 red bell pepper
  • 1/2 green bell pepper
  • 1 serrano pepper
  • 2 jalapeno pepper
  • 4 minced garlic cloves (or to taste)
  • 2 pounds lean ground beef
  • 1/4 cup Worcestershire sauce
  • garlic powder (to taste)
  • Badia complete (to taste)
  • 16 oz of beef broth (or water + 2 bouillon cubes)
  • 1 can (28 oz) of crushed tomatoes
  • 1 can (14.5 oz) of fire-roasted diced tomatoes
  • 1 can tomato paste (can leave out if you want more of a thin Wendy’s chili texture)
  • 2 tablespoons chili powder
  • 2 tablespoons cumin
  • 1 tablespoon brown sugar
  • 1 tablespoon hot sauce (I used Scotch Bonnet)
  • 1 tablespoon dried basil
  • 2 tablespoons smoked paprika
  • 1 tablespoon dried oregano
  • 1 teaspoon of dried peri peri pepper flakes (crushed red pepper flakes will work!)
  • salt & pepper (to taste)
  • 3 cans of beans (I use 1 each of the following: pinto, black beans, and dark red kidney beans)
  • assorted toppings (cheese, sour cream, cilantro, diced onions, corn chips, etc.)

All seasonings can be adjusted to your own liking!

INSTRUCTIONS

  1. Chop your veggies into a small dice.
  2. Coat the bottom of a Dutch oven with olive oil and sauté your veggies until soft, around 5 minutes. If needed, add a little water to keep from sticking to bottom of the pan.
  3. Add in your ground beef to your caramelized veggies and cook until browned.
  4. Once your meat is browned, add in the Worcestershire sauce and flavor with a few generous shakes of dried garlic powder and Badia complete. Add a pinch of salt and pepper at this time as well.
  5. If using tomato paste (depending on if you want a thin or thick chili), make a well in the center of your meat and veggie mixture before adding your tomato paste. Allow your tomato paste to cook for about 2 minutes, ensuring that it caramelizes and optimizes its flavor.
  6. Once tomato paste is caramelized, add in your spices and cook for another minute, allowing them to bloom.
  7. Once spices are bloomed, add in the remaining ingredients: broth, cans of tomatoes, and beans.
  8. Once heated through and thickened (at least 20 minutes), taste and adjust spices accordingly.
  9. Top with cheese, sour cream, chopped cilantro, diced onions, corn chips, etc.

NOTES

While it looks like a lot of ingredients, most of them are spices and pantry staples. Feel free to use whatever you have on hand when it comes to peppers and beans, but the listed peppers are what I used to get praise-worthy results! I love a mix of beans (pinto, black beans, and dark red kidney beans) to give the chili different textures, so feel free to experiment there if you wish!

Nothing says love on a cold day like a bowl of spicy chili and a slice of warm, slathered corn bread.

I love you, kiddos!

Joe’s Adobada Marinade

INGREDIENTS

  • 7 guajillo chiles (New Mexico)
  • 1 chili ancho
  • 5 garlic cloves
  • 1 tsp oil
  • 1 tsp apple cider vinegar
  • 1 tsp oregano
  • 1 tsp thyme
  • 1 tsp paprika
  • 1 tsp peppercorns
  • 1 tsp cinnamon
  • 1 tsp ancho chili powder
  • 1 tsp cumin
  • 2 tsp salt
  • 2 tsp chicken bouillion
  • 5 cloves

INSTRUCTIONS

  • Toast chiles after removing seeds & checking for mold.
  • Cover with water and bring to a boil.
  • Once boiling, remove from heat and allow to cool.
  • Add all ingredients to blender and mix.

NOTES

This marinade will be enough to flavor 3-5 pounds of meat. We use this mixture to flavor strips of pork that we skewer on kabobs and grill with pineapple for an al pastor type taco. Once grilled, we remove meat from skewers, cut into small pieces, and serve on tortillas with grilled pineapple — con todo (cilantro and onion) — and Joe’s Salsa Cremosa Verde and/or Habanero Cremosa. You can’t beat it!

Joe’s Salsa Cremosa de Habanero

INGREDIENTS

  • 125 g neutral oil
  • 360 g onion
  • 75 g garlic
  • 4 each allspice
  • 50 g habanero peppers
  • 135 g orange juice
  • 8 g salt (around 1 tsp)
  • 60 g lime juice (around 2 limes)

INSTRUCTIONS

  • Char habaneros.
  • In a sauce pot, combine oil, onion, garlic and allspice.
  • Cook on medium until golden.
  • Add charred habaneros and continue cooking until golden brown and tender.
  • Cool.
  • Combine cooled mixture with juices and salt in a blender.
  • Puree until creamy and smooth.
  • Adjust seasoning as needed.
  • Enjoy with tacos or your favorite Mexican dish!

Joe’s Salsa Cremosa Verde

INGREDIENTS

  • 135 grams neutral oil
  • 180 g onion
  • 170 g serrano chiles
  • 50 g garlic
  • 30 g cilantro (blanched)
  • 70 g ice water
  • 8 g salt
  • 1/2 tsp of chicken bouillon, if desired.

INSTRUCTIONS

  • In a saucepan, add oil, onion, serrano chiles & garlic. Cook on medium heat until golden brown.
  • Let cool.
  • Add cooled mixture to blender with blanched cilantro, cold water, and salt. Puree until creamy.
  • Adjust seasoning with salt, bouillon, or sugar … to taste!
  • Once completely cooled, put cremosa into refrigerator until needed.
  • Enjoy on your favorite tacos or Mexican dishes!

Grilled Asian-inspired Chicken Kabobs / Char Siu-esque Pork Kabobs

INGREDIENTS

Marinade:

  • 2 lbs chicken tenderloins/thighs OR boneless pork tenderloin
  • 2 tbsp chinese five-spice powder
  • 1/4 tsp pepper
  • 1 tsp salt
  • 1/4 cup light soy sauce
  • 1 tbsp hoisin sauce
  • 2 tbsp honey
  • 1 tbsp brown sugar
  • 2 heaping tbsp minced garlic
  • 1 tbsp minced/grated ginger
  • 1 tbsp red pepper flakes (or 1 tsp of ground peri-peri flakes, to taste)
  • 1 tbsp sesame oil
  • a few drops of red food coloring (IF USING PORK for char siu-esque appearance)

INSTRUCTIONS

  • Make a marinade using the ingredients listed and then pour of your protein, using the red food color primarily if using pork for that char siu-esque appearance.
  • Allow protein to marinade in the refrigerator for at least 2 hours, but 4-6 is optimal.
  • Remove from fridge about 1 hour before grilling.
  • Before grilling, assemble kabobs.
  • Grill kabobs until desired doneness. I like a few crispy edges on mine!
  • Enjoy!

Grilled Indian-inspired Pork Kabobs

INGREDIENTS

  • cubed pork tenderloin (enough to make about 5 skewers)
  • 1 tsp kosher salt, to taste
  • 4 tbsp Greek Style Yogurt
  • 4 minced garlic gloves
  • ½ tbsp minced Ginger, to taste
  • 2–4 Red Chilies, to taste – finely chopped (I used ground dried peri peri chilis instead as that is what I have on hand)
  • 1 tbsp freshly squeezed lemon juice
  • ¾ tsp freshly cracked Black Pepper
  • 2 tsp Garam Masala
  • 1 tbsp ground cumin
  • 1 tbsp coriander powder
  • 1 tbsp turmeric powder (or curry powder)
  • 1 tbsp honey or brown sugar
  • 1 tsp ground cayenne, optional
  • 1 tbsp canola oil
  • a few drops of red food color

INSTRUCTIONS

  • Cube up pork tenderloin into small pieces and place into large bowl.
  • Add remaining ingredients (with the exception of the food color) to the bowl of cubed pork and then stir with a large silicon spoon, making sure to thoroughly coat each piece and equally distribute the marinade mixture.
  • Add a few drops of red food color, if desired.
  • Allow the pork to marinade in the refrigerator for at least 2 hours (preferably 4 or more)
  • One hour before grilling, remove marinated pork from fridge and assemble kabobs.
  • Grill skewers on charcoal grill (or cook cubes in air fryer) until desired doneness.
  • Serve with paratha, chopped cilantro and lime slices, and a side of roasted curried sweet potatoes and chickpeas.
  • Enjoy!

Create a website or blog at WordPress.com

Up ↑