Easy Homemade Pretzels

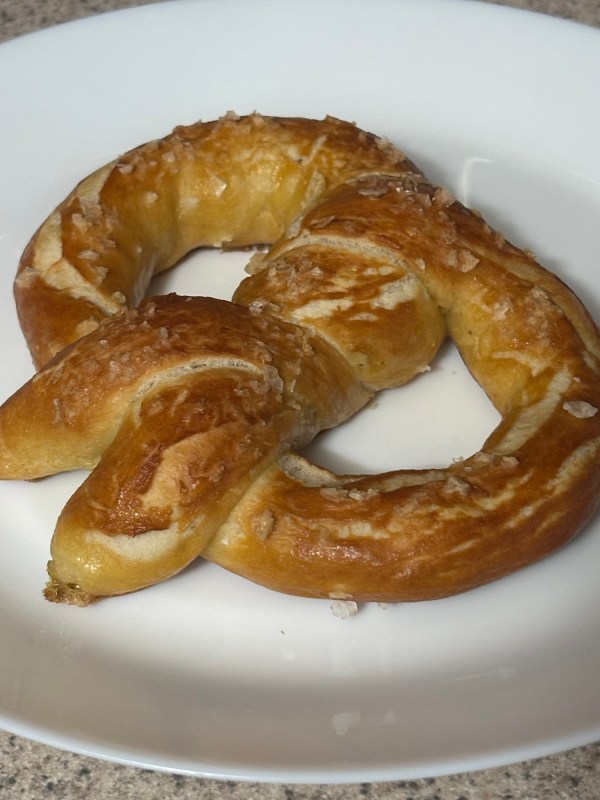
Makes 4 large pretzels.

INGREDIENTS

  • 3/4 cup warm water (110 degrees F)
  • 1 tsp active dry yeast
  • 1 tsp sugar
  • 2 cups all-purpose flour
  • 1/2 tsp salt
  • 1 tbs melted butter, salted

Please note: Will also need water and baking soda mixture to boil pretzels prior to baking and an egg wash + kosher salt for that perfect pretzel crust.

INSTRUCTIONS

  • Whisk together warm water, yeast, and sugar. Allow to bloom for 10 minutes. Mixture should be foamy.
  • In a stand mixture, add your flour, salt, melted butter, and wet mixture. Kneed for 10 minutes.
  • Kneed a few minutes by hand before adding dough ball to greased bowl.
  • Cover dough with towel and allow to rest for one hour.
  • Once rested, turn dough out onto a lightly floured surface before dividing into four pieces.
  • Roll out into a noodle shape before shaping into pretzel. Grab the ends, cross x 2, and flip towards you.
  • Preheat oven to 450 degrees.
  • Boil water with baking soda.
  • Place each pretzel into boiling water — one at a time — for about 30 seconds.
  • Place boiled pretzels on a parchment lined baking tray.
  • Brush each pretzel with an egg wash and sprinkle generously with kosher salt.
  • Bake at 450 degrees for 15 minutes until brown and crispy.
  • Enjoy with your favorite cheese sauce or mustard.

NOTES

Original recipe was found on TikTok via user Revi (@reviskitchenn).

You can also just roll out as usual, and then instead of twisting into pretzel shape, divide roped dough into small pretzel bites before continuing the process. These would make amazing pretzel bites!

Peanut Butter Buttons (Also: Peanut Butter Blossoms)

Original recipe can be found here: Peanut Butter Blossoms – Preppy Kitchen

INGREDIENTS

  • ¾ cup creamy peanut butter (188g)
  • ½ cup unsalted butter softened (113g)
  • ½ cup granulated sugar plus more for rolling (100g)
  • ½ cup packed light brown sugar (110g)
  • ¼ teaspoon salt
  • 1 large egg room temperature
  • 1 teaspoon vanilla extract
  • 1½ cups all-purpose flour (180g)
  • ½ teaspoon baking soda
  • 36 Hersey’s chocolate kisses unwrapped (or miniature Reese’s PB cups for Peanut Butter Blossoms – see notes)

INSTRUCTIONS

  • Preheat the oven to 375°F. Line cookie sheets with parchment paper.
  • In a large mixing bowl or the bowl of a stand mixer fitted with the paddle attachment, combine the peanut butter, unsalted butter, sugars and salt. Cream together by beating on medium speed until well combined. Add the egg and vanilla. Beat until well combined. Scrape down the bowl. Add the flour and baking soda and beat on low speed just until combined.
  • Scoop the dough and roll into 1-inch balls. Coat in additional granulated sugar if desired. Place on a prepared baking sheet 2 inches apart.
  • Bake for 8 to 10 minutes or until the cookies look puffy and cracked and the bottom just start to turn brown. Immediately press a chocolate kiss into the center of each cookie. (The cookies will crack and that’s okay!) Allow the cookies to cool completely on the pan, until the chocolate is set. Serve or store in an airtight container for up to 1 week.

NOTES

When making Peanut Butter Buttons, I like to press the tip of the Hershey Kiss into the cookie once slightly melted. This helps with stacking for storage. And while sprinkles are always a favorite for special occasions, my favorites will also be rolled in turbinado sugar instead.

And while I use this recipe primarily to make Peanut Butter Buttons, I also use the base recipe to make Peanut Butter Blossoms. For Blossoms, I press the prepared dough into mini muffin tins and bake about 10 minutes, until edges are lightly golden but still soft and gooey in center. Once out of the oven, I press unwrapped miniature Reese’s Peanut Butter Cups into the center of each cookie while still warm. Once cookies are cooled slightly and set, I remove the cookies from the muffin tins and allow to cool on a cooling rack. No matter which way you prepare this dough, it’s the perfect amount of peanutty sweetness!

Please visit the original recipe via the link provided at the top of the page or watch the video embedded below for additional information about this amazing recipe.


Snowball Cookies

INGREDIENTS

  • 1 cup butter, softened (2 sticks)
  • 2/3 cup powdered sugar
  • 2 tsp vanilla extract
  • 0.5 tsp almond extra
  • 2.25 cups all-purpose flour
  • 0.5 tsp salt
  • 2 tbsp cornstarch
  • 1/2 to 3/4 cups chopped pecans
  • Additional powdered sugar to coat cookies (about 1 cup)

INSTRUCTIONS

  • Whip together butter and powdered sugar until light and creamy.
  • Add vanilla and almond extracts to creamed mixture.
  • In another bowl, sift together your dry ingredients: AP flour, salt, cornstarch
  • Add your dry to your creamed ingredients in 3 parts.
  • Fold in your nuts.
  • Put combined dough into fridge for about 30 minutes.
  • Preheat oven to 350 degrees.
  • Once dough is chilled, use a small cookie scoop to place cookie dough balls onto 2 baking sheets lined with parchment paper. Allow at least an inch between cookie but know that they do not really spread. You can fit about 20 cookies on one baking sheet.
  • Bake cookies in preheated oven for about 10 minutes. Cookies will be very blonde. DO NOT TOUCH once removed from oven.
  • Allow cookies to cool for about 10 minutes.
  • Once slightly cooled, place cookies on a cooling rack to finish cooling off completely.
  • Once cookies are completely cooled, coat cookies in additional powdered sugar. Be gentle as they are delicate.
  • Enjoy!

NOTES

Original recipe discovered via TikTok: Angela Kay’s Kitchen. We called these Mexican Wedding Cookies while growing up. They are a fav!

Homemade Bolillos

INGREDIENTS

  • 3.5 cups bread flour (optional: all-purpose)
  • 1 tsp salt
  • 1.5 tsp yeast
  • 1.5 tsp sugar
  • 1.5 cups warm water
  • 1 tbsp oil (*plus less than a tsp to rub on dough ball prior to rising — see instructions)

INSTRUCTIONS

  • Add all ingredients into stand mixer & kneed for 7 minutes.
  • Lightly flour surface and kneed into a ball.
  • Lightly cover with *additional oil and place into a bowl, covering with a kitchen towel before letting it rise somewhere warm for an hour. See notes!
  • Once your hour rise time is over, punch down dough and divide into 6 pieces.
  • Flatten out and roll into desired football shape. See notes to link for original recipe to get visual guidance on how to fold.The best way I can describe it is to flatten into an oval and slowly fold down from the top until rolled into a football shape, pinching at the edges to make the points.
  • Cover and let them rise for another hour.
  • Once second rise is over, brush with melted butter and score each dough down the middle.
  • Bake at 450 degrees for around 15 minutes (or until golden brown).
  • Brush with butter, if desired.

NOTES

I found this recipe via Tiktok user C’s Kitchen.

I take about 1 tbsp of butter and brush the baked bread with the butter immediately after removed from oven.

Momma-style Bread Machine Rolls

INGREDIENTS

  • 8 oz water
  • 2 tbsp oil
  • 1 tsp salt
  • 2 tbsp powdered milk
  • 2 tbsp sugar
  • 320 g all-purpose flour
  • 1.5 tsp fast rising yeast

*Additional ingredients: I brush the tops of my baked rolls with butter once out of the oven. Should be about 1 tablespoon of butter, if that. I also sometimes lightly sprinkle flaked Maldon salt on top of my freshly buttered rolls.

INSTRUCTIONS

  • Add all the ingredients EXCEPT for the flour and yeast into the bread machine pan in the order listed.
  • Add in the all-purpose flour.
  • Make a well in the center of the flour and add in your yeast.
  • Once bread machine pan is locked in place, set the bread machine setting to DOUGH.
  • Once the bread machine completes its dough cycle, remove the dough from the bread machine pan onto a lightly floured surface.
  • Divide dough into half, then cut each half into thirds, before cutting each third into halves for a dozen large rolls.
  • Roll each piece into a ball and place onto a greased 9×13 baking pan.
  • Place the rolls in a warm place (*see notes) to rise for about an hour (until doubled in size).
  • Heat oven to 400 degrees.
  • Bake for 12-15 minutes, or until golden brown.
  • Brush the tops of the freshly baked rolls with butter (and sprinkle tops with flaked Maldon salt, if desired).

NOTES

For my warm place, I heat my own for only 1 minute at 350 degrees (just enough to warm the space), turn off the oven, turn on the oven light, and let my rolls rest in the closed oven for the required hour.

French Vanilla Crinkle Cookies

INGREDIENTS

  • French Vanilla box cake mix (or cake mix of your choice)
  • 1/3 cup neutral oil
  • 2 eggs, slightly beaten
  • powdered sugar to roll cookies in for crinkle texture

INSTRUCTIONS

  • Preheat your oven to 350°F (175°C) and line a baking sheet with parchment paper.
  • In a mixing bowl, combine the red velvet cake mix, eggs, and vegetable oil. Stir until a thick dough forms. Chill the dough for about 15-30 minutes to make it easier to handle.
  • Using a cookie scoop or your hands, form the dough into balls (about 1 inch in diameter). Roll each ball in powdered sugar until fully coated. For a better crinkle effect, roll them twice in powdered sugar.
  • Place the cookie balls on the prepared baking sheet, spacing them about 2 inches apart. Bake for 10 to 12 minutes, or until the edges are set but the centers are still soft. The cookies will continue to firm up as they cool.
  • Cool and Enjoy: Allow the cookies to cool on the baking sheet for a few minutes before transferring them to a wire rack to cool completely. Enjoy your delicious red velvet crinkle cookies!

NOTES

These are just typical cake mix cookies, and any flavor cake mix will do. The cake flavor in the preview image is birthday cake flavored, for example. However, there’s something special about using the French Vanilla box mix for these treats. It provides almost a cheesecake-like flavor that is our favorite. Enjoy!

The Perfect Swim Biscuits & Southern-style Chocolate Gravy

The perfect biscuit is such a personal preference. Some people enjoy soft, fluffy biscuits. Some people enjoy a buttery, layered biscuit. And me? I love a biscuit that is somewhere between my mom’s fluffy biscuits and my grandmother’s buttery biscuits with a crispy crust straight from the cast iron. That’s where these easy swim biscuits come in!

INGREDIENTS

Biscuits:

  • 1 stick of butter
  • 2-1/2 cups flour
  • 4 teaspoons baking powder
  • 4 teaspoons sugar
  • 2 teaspoons salt
  • 2 cups of milk

Chocolate Gravy:

  • 3/4 cups sugar
  • 1/4 cups cocoa
  • 3 tablespoons flour
  • 1 tablespoon of butter
  • 2 cups of milk or water
  • pinch of salt (to taste)

INSTRUCTIONS

Biscuits:

  1. Turn on oven to 425 degrees.
  2. Place stick of butter into your cast iron skillet and put into oven as it is heating. Remove from oven when butter is melted (about 10 minutes). I like to leave it in there until the milk solids start turning golden.
  3. In a bowl, combine dry ingredients before adding in milk.
  4. Once butter is melted in iron skillet, drop heaping spoons of dough into the melted butter forming individual biscuits. I usually make around 9 large biscuits.
  5. Swirl your pan a little so that some of the butter also gets on top and in between your biscuits.
  6. Cook in 425-degree oven for about 25 minutes, or until the edges are crispy and the tops are golden brown.

Chocolate Gravy:

  1. Sift dry ingredients together into a saucepan.
  2. Slowly incorporate water or milk into dry ingredients. (My mom used water instead of milk!)
  3. Heat at medium heat, stirring frequently, until the mixture is combined (no lumps!) and has thickened to a gravy consistency.
  4. Finish with a tab of butter (and some people add a touch of vanilla, but this was not traditional in our house growing up).

NOTES:

While it is trendy now to call this chocolate gravy and biscuits, these were just “chocolate biscuits” to us when growing up. This treat is a staple for any weekend country breakfast. Since Zach doesn’t like chocolate biscuits, make sure you also make a quick & tasty sausage milk gravy to top those swim biscuits! Add grits and a side of bacon … and you’re home. I love you, kiddos!

Lacey Almond Thin Cookie Recipe

I originally found this recipe listed as Wedding Cookies, but the results were not what I normally associate as such. These cookies more closely resemble a lacey Almond Thin. I feel like the original recipe author perhaps forgot an ingredient when posting (an egg, maybe?), but the results were these rich, thin cookies that became my favorite contribution to the Christmas cookie season.

Let the baking madness that is a hallmark of Christmas begin!

Also: These are AMAZING cold. I’m talking straight-out-of-the-freezer cold! Trust me on this one …

INGREDIENTS

  • 1 cup sugar
  • 1/2 cup butter, softened
  • 3 ounces of cream cheese
  • 1 teaspoon vanilla
  • 1/8 teaspoon almond extract
  • 1 cup flour
  • pinch of salt

INSTRUCTIONS

  • Cream together the first 5 ingredients.
  • Fold the flour and pinch of salt into the creamed mixture.
  • Place dough into fridge to chill for 30 minutes while heating oven to 350 degrees.
  • Using a small cookie scoop, place 8 dough balls evenly spaced onto ungreased cookie sheet.
  • Place cookies into a 350-degree oven for 14-18 minutes (or until golden brown).
  • Cookies will be spread when cooking and become VERY delicate. They are done when edges are lacey and golden brown. I like the edges very lacey and messy as the crunch is spectacular.
  • Allow to cool almost completely before coating with powdered sugar.
  • Store cooled cookies in fridge (or freezer!) until serving.

This recipe makes about 16 cookies.

Preppy Kitchen’s Delicious Cream Puffs

Recipe highlight: The following is copy/pasted from Preppy Kitchen’s Blog and Youtube tutorials for posterity’s sake. There is invaluable additional information regarding this complicated recipe that can be found by clicking on the provided links. Please check out the original recipe for the best results!

Ingredients

Pastry Cream:

  • 1½ cups whole milk (360mL)
  • 1½ cups heavy cream (360mL), divided
  • 1 vanilla bean split and seeds scraped
  • ⅔ cup granulated sugar (133g)
  • ¼ cup cornstarch (30g)
  • ¼ teaspoon salt
  • 6 large egg yolks
  • 1 tablespoon cold unsalted butter

Puffs (Choux Pastry):

  • 1 cup water (240mL)
  • ½ cup unsalted butter (113g)
  • 1½ tablespoons granulated sugar
  • ½ teaspoon salt
  • 1 cup all-purpose flour (120g)
  • 3 to 4 large eggs
  • confectioner’s sugar for dusting

Instructions

For the Filling:

  • Combine the milk, ½ cup cream, and scraped vanilla seeds in a medium pot and place on medium-high heat whisking occasionally. Bring to a boil and immediately turn off the heat and set aside.
  • In a large bowl, whisk the sugar, cornstarch, and salt together then add the egg yolks. Whisk until pale yellow and smooth. While whisking, slowly pour in ½ cup of the hot milk mixture until incorporated. Whisk in the remaining hot milk mixture. Pour the mixture through a strainer back into the saucepan.
  • Cook the egg yolk mixture over medium-high heat, whisking constantly, until thickened and just starting to bubble. The whisk should leave a defined trace when moved through the custard. Remove from the heat and whisk in the butter until fully melted and combined. Transfer the custard to a large bowl.
  • Cover with plastic wrap, lightly pressing the plastic against the surface to prevent a skin from forming. Chill for at least 2 hours or until ready to serve. The custard can be made up to 2 days in advance.

For the Choux Pastry:

  • Preheat the oven to 425F. Line a large sheet pan with parchment paper.
  • In a large saucepan, bring the water, butter, sugar, and salt to a boil over medium-high heat. When it boils, immediately take the pan off the heat.
  • Add all of the flour at once and stir hard with a wooden spoon until all of the flour is incorporated. Return to medium heat and cook, stirring for about 60 seconds.
  • Scrape the mixture into the bowl of a stand mixer fitted with a paddle attachment (you can also use a hand mixer). Beat at medium speed for about 2 minutes to cool the mixture down. (it will still be warm.)
  • With the mixer running, add 3 eggs, one at a time, stopping to scrape down the sides of the bowl between each egg. Mix until the dough is smooth and glossy and the eggs are completely incorporated. The dough should be thick but fall slowly and steadily from the beater when lifted out of the bowl. If the dough is still clinging to the beater, add the remaining 1 egg and mix until incorporated.
  • Transfer the dough to a pastry bag fitted with a large round tip and pipe dollops roughly 2 inches in diameter and 1 inch high. Lightly wet a finger and tap down the spike on top. (For additional color during baking, you can brush the tops of the dough lightly with an egg wash.)
  • Bake for about 20 minutes or until the dough is golden brown and appears dry. (Try not to open the oven door during the bake.) Remove the baking sheet from the oven. Carefully poke holes in the side of each puff by inserting the tip of a small knife about halfway into the puff. Return to the oven and bake for another 3 minutes. Remove and let cool completely on the baking sheet. (You can turn the oven off and leave the puffs in the oven with the door cracked open after baking if you’d like them to really dry out.)

For the Assembly:

  • Place the remaining 1 cup cold cream from the filling in a large bowl and beat until stiff peaks form. Remove the custard from the fridge and whisk it to break it up and smooth the texture out. Fold the whipped cream into the custard. Transfer the filling to a piping bag fitted with a star tip
  • Cut the tops of the cooled puffs off with a serrated knife. You can scoop out some of the softer strands inside, if desired. Pipe the cream filling into each pastry then place the cap on, and lightly dust with confectioners’ sugar. Cream puffs are best if enjoyed within a few hours of assembly. Any leftovers can be stored in the fridge in an airtight container for up to 2 days.

Notes

I am STILL trying to perfect this dessert despite it being a family favorite. It is a must-have for my brother’s birthday! And of all the recipes for creme puffs, Preppy Kitchen’s version is definitely my favorite to date!

However, for nostalgia’s sake, I am including a picture of the recipe that my mother used to make creme puffs. The version in the images below was included in a recipe book that was lovingly put together by one of my sisters for all of my siblings after my mother’s passing. While the recipe from Preppy Kitchen is an elevated version, mom’s version is and always will be near and dear to my heart.

Christmas Toffee Bark

INGREDIENTS

  • 1 C butter
  • 1 C brown sugar, packed
  • 2 C chocolate morsels (milk chocolate, semi-sweet, dark … your choice!)
  • 40 saltine crackers (or cracker of your choice … including graham crackers of pretzels!)
  • Topping of your choice, optional (Example: nuts, sprinkles, flaked sea salt)

INSTRUCTIONS

  • Line jelly roll pan with foil. Spray foil with nonstick spray. Lay crackers flat onto foil-covered pan.
  • Cook butter and brown sugar for 6-10 minutes before pouring over crackers.
  • Bake in a 350 oven for 8-10 minutes or until caramel mixture is bubbly.
  • Remove from oven and let sit for 3-5 minutes. Sprinkle chocolate chips on top of and let melt for about 5 minutes. Chocolate morsels will be shiny and soft when ready to spread. Immediately sprinkle the topping of your choice, if desired.

REVIEW

So rich and addictive. You simply cannot tell that crackers are used as the crunchy base for this bark. Totally amazing for an easy holiday treat. A favorite year after year …

For my kiddos: Link to a similar recipe that includes a video in case you have any questions when making this tasty treat: https://www.littlesweetbaker.com/christmas-crack-saltine-cracker-toffee/

MERRY CHRISTMAS!

Create a website or blog at WordPress.com

Up ↑